ASP.NET Web API Crash Course (Exploring .NET E4)
Published on 2022-04-18 by Ruben Heeren
Introduction
In this entry of Exploring .NET you'll learn about the ASP.NET framework. ASP.NET is the part of the .NET development platform that focuses on the web. In this piece of content we'll specifically hone in on Web APIs because that was the most requested subject.
In the previous episode we built a serverless REST API using Azure Functions and we stored the data in Azure Cosmos DB.
This is the final episode for now, as people requested other standalone content way more than new Exploring .NET episodes so I'll listen to that.
You can download the source code here.
If you’re new here, welcome! I’m Ruben and it’s my goal to help you learn software development with .NET.
Links to the sources I used can be found at the end of this blog post.
You can check out the live demo of the end result of this tutorial here.
If you prefer video content, check out the video version of this blog post below: <br> <br>
Prerequisites
Later on, we'll build a web API ourselves. To follow along, you need Visual Studio 2022 Community (free) with the ASP.NET and web development workload installed. Standard optional settings are ok. You can also use Visual Studio Code set up for C# development.
We'll use SQLite + Entity Framework Core for the database. You need the Entity Framework Core tools installed. This takes 1-2 minutes. Refer to this guide.
What is ASP.NET?
Let's start at the beginning and define what ASP.NET is.
If I had to say it in one sentence it would be the following:
ASP.NET is a mature Web framework that allows you to build most web apps you can imagine. ren For a more thorough answer, let's use the formal definition from Wikipedia:
ASP.NET is an open-source, server-side web-application framework designed for web development to produce dynamic web pages. It was developed by Microsoft to allow programmers to build dynamic web sites, applications and services.
The name stands for Active Server Pages Network Enabled Technologies. It was first released in January 2002 with version 1.0 of the .NET Framework and is the successor to Microsoft's Active Server Pages (ASP) technology.
ASP.NET is built on the Common Language Runtime (CLR), allowing programmers to write ASP.NET code using any supported .NET language. The ASP.NET SOAP extension framework allows ASP.NET components to process SOAP messages.
Now you might be wondering, what is SOAP? Well according to Wikipedia: SOAP is a messaging protocol, and often compared to REST. SOAP allows developers to invoke processes running on different operating systems (such as Windows, macOS, and Linux) to authenticate, authorize, and communicate using Extensible Markup Language (XML). Since Web protocols like HTTP are installed and running on all operating systems, SOAP allows clients to invoke web services and receive responses independent of language and platforms. It's basically a variant to REST.
ASP.NET's successor is ASP.NET Core. It is a re-implementation of ASP.NET as a modular web framework, together with other frameworks like Entity Framework. The new framework uses the new open-source .NET Compiler Platform (codenamed "Roslyn") and is cross platform.
ASP.NET MVC, ASP.NET Web API, and ASP.NET Web Pages (a platform using only Razor pages) have merged into a unified MVC 6.
You might have guessed that ASP.NET is a big framework and you would be correct. It's been around for 20 years when I wrote this sentence which is rare in the software world. Over the years the platform has grown and matured into the ASP.NET we know and love today. You can do full stack web development with ASP.NET but in the wild I expect that you'll see it used in the back end more than in the front end.
When To Use ASP.NET and Why?
So when should we use ASP.NET? Well, ASP.NET is mainly used by web developers to build complex web projects, like web applications with their own internet domains and dynamic websites like my own.
To further illustrate what ASP.NET is capable of: my website fully runs on ASP.NET (the Core version) and has a secured admin area, it uses ASP.NET's built-in authorization framework. It functions much like the admin area of a WordPress site. In the admin area, I can manage blog posts like this one. It also has a fully featured Markdown editor that then generates a static HTML page, which in turn generates an XML sitemap that search engines use for ranking web pages in the search results.
ASP.NET Core is the open-source and cross-platform version of ASP.NET. Whenever I refer to ASP.NET from now on, I mean ASP.NET Core. I think Microsoft might rename ASP.NET Core to just ASP.NET in the future, which they also did for the .NET platform as a whole.
ASP.NET is easy to use, but offers extensive flexibility. It's also fast. Because .NET code, once it's written, will be compiled into one or more assemblies. These will then be translated into MSIL (Microsoft Intermediate Language). When code is compiled in this way, it is able to run much faster than other types of scripting languages (such as JavaScript) because it becomes a closer representation to machine code.
The main language used for ASP.NET is C#. C# is a powerful and widely used programming language that you can use to make websites, games, mobile apps, desktop apps and more. C# is object oriented right down to its core. Using C# has many advantages, which this Pluralsight article conveys well.
Here are some business use cases ASP.NET will handle well: <ul> <li>Any internal software required to deal with data. If you're using existing software programs to collect, track and analyze data, whether it's employee data within your HR systems, time management systems, and accounting systems, or customer data within your sales and marketing systems, ASP.NET is one of the best options available to you. It allows you to display the most important of your data within a web app. ASP.NET's ability to deal with complex and large data sets in a user-friendly way makes it very useful for companies.</li> <li>Any web application that must generate dynamic content. A dynamic web page is a page on which different types of content is displayed every time it's browsed. The content changes based on the user's behavior, preferences, and interests. If you need to create web applications that generate dynamic content, the ASP.NET framework is a great option due to its dynamic data scaffolding and page templates features.</li> <li>Basically any custom software you could need.</li> </ul>
Exploring Popular Components of ASP.NET
ASP.NET got so big over the years that it now has a bunch of sub-frameworks. In this section we'll subdivide ASP.NET into its what I believe to be most popular component parts and take a look at what we can do with each of them.
ASP.NET Extends .NET
Let's start with .NET, because ASP.NET extends the .NET platform with tools and libraries specifically for building web apps.
These are the main components of the .NET platform: <ul> <li>Languages: These include C#, VB.NET and F#, as well as compilers. C# is the most popular one.</li> <li>Base libraries that allow programmers to work with strings, dates files etc.: The .NET framework has a set of standard class libraries that provide many utilities.</li> <li>Editors and tools that are compatible with all major operating systems, including Docker.</li> <li>Common Language Runtime: All .NET programs run on the Common Language Runtime which they use for performing key activities, like Exception handling and Garbage collection.</li> </ul>
These are some things that ASP.NET adds to the .NET platform: <ul> <li>Base framework for processing web requests in C# or F#.</li> <li>Web-page templating syntax, known as Razor, for building dynamic web pages using C#.</li> <li>Libraries for common web patterns, such as Model View Controller (MVC).</li> <li>Authentication system that includes libraries, a database, and template pages for handling logins, including multi-factor authentication and external authentication with Google, Twitter, and more.</li> <li>Editor extensions to provide syntax highlighting, code completion, and other functionality specifically for developing web pages.</li> </ul>
Web APIs
This is probably the thing ASP.NET is best-known for. It basically allows you to build back-ends with C#. Let's define some jargon first.
Application Programming Interfaces (APIs) are constructs made available in programming languages to allow developers to create complex functionality more easily. They abstract more complex code away from you, providing some easier syntax to use in its place.
A web API is an application programming interface for either a web server or a web browser. Web APIs basically allow you to call methods on a web server via HTTP.
A server-side web API is what ASP.NET allows you to build. That is defined as a programmatic interface consisting of one or more publicly exposed endpoints to a defined request–response message system, typically expressed in JSON or XML. Usually that data travels via the web using an HTTP-based web server. Microsoft has us covered here, because an ASP.NET Core app runs with an in-process HTTP server implementation.
Specific entries of web APIs that are callable are called endpoints. On this page you can see an example list of GitHub API endpoints.
I believe the most common use case for web APIs is to allow clients, which mainly consists of end users on browsers or smartphone apps, to manipulate database records. An example is a YouTube video. The creator posts it to YouTube, and in doing so they interact with YouTube's web APIs to add the video to a database somewhere. That video has likes and comments, given by users that click a button, which then calls one of their web APIs to update a value in the video database record.
ASP.NET Web API is an ideal platform for building RESTful services. It also supports the ASP.NET request/response pipeline. In a nutshell, it maps HTTP verbs to method names that then run on the server and usually interact with a database.
With ASP.NET Web APIs you can support different formats of response data. There is built-in support for JSON, XML and BSON. You can host your web API on all operating systems. Microsoft's Internet Information Services (IIS) is supported. You can also go for self-hosted or any other web server that supports .NET Core.
Single Page Web Apps With Blazor
Blazor allows you to build fully client-side or server hosted web apps with C#. Think Angular, but from Microsoft and (almost) no JavaScript (or TypeScript) needed. My website, including this blog runs on Blazor and is almost fully coded in C#.
Blazor apps are composed of reusable web UI components implemented using C#, HTML, and CSS. Both client and server code is written in C#, allowing you to share code and libraries. This is great if you also have an ASP.NET Web API in the same solution.
Blazor can run your client-side C# code directly in the browser, using WebAssembly. Because it's real .NET running on WebAssembly, you can re-use code and libraries from server-side parts of your application.
Alternatively, Blazor can run your client logic on the server. Client UI events are sent back to the server using SignalR - a real-time messaging framework. Once execution completes, the required UI changes are sent to the client and merged into the DOM.
Blazor is built on open web standards. It doesn't require plug-ins or code transpilation. Blazor works in all modern web browsers, including mobile browsers. Code running in the browser executes in the same security sandbox as JavaScript frameworks.
Blazor code executing on the server has the flexibility to do anything you would normally do on the server, such as connecting directly to a database.
JavaScript isn't a must anymore but it does have a rich ecosystem of APIs and libraries you might want to use. If so, don't worry, with Blazor you can still access all of these using JavaScript interop. It allows you to interact with JavaScript code from C# and the other way around.
If you want to learn Blazor, check out my bestselling Udemy course.
Traditional Web Apps With Model-View-Controller (MVC)
Another popular way to build web apps is by following the Model-View-Controller (MVC) software design pattern.
Some of the big guys use ASP.NET MVC in production, including Stack Overflow, Microsoft, GoDaddy and Ancestry.com.
This pattern is commonly used for developing user interfaces that divide the related program logic into three interconnected elements: Models, Views, and Controllers. This is done to separate internal representations of information from the ways information is presented to and accepted from the user. It helps to achieve separation of concerns.
Using this pattern, user requests are routed to a Controller which is responsible for working with the Model to perform user actions and/or retrieve results of queries. The Controller chooses the View to display to the user, and provides it with any Model data it requires.
In ASP.NET, MVC is a first-class citizen. It started its life in 2007 under the name ASP.NET MVC CTP and the current version at the writing of this post, ASP.NET MVC 5.2.8 is still going strong. Many of the ASP.NET jobs available are about ASP.NET MVC.
Check the sources at the end of this post to learn more about ASP.NET MVC.
Building a Simple Web API
Now, we'll focus on building a simple web API using the latest version at the time of writing (.NET 6) so that you actually see some real code.
As a bonus, we'll publish it for free to the Microsoft Azure Cloud.
We'll use Visual Studio 2022 Community (which is free) as the IDE. Make sure you have the ASP.NET and web development workload installed.
If you haven't yet, install the Entity Framework Core tools following this guide.
If you want to publish your web API to Azure, get yourself a free Azure account.
Ok to get started, open Visual Studio.
Click Create a new project.
Search for web api.
Select the result named ASP.NET Core Web API.
Click Next.
For the Project name, give it a descriptive name, like ExampleWebAPI.
Choose the Location on your file system where you want the solution to live.
For the Solution name, give it a descriptive name, like ExampleWebAPISolution.
I like to keep Place solution and project in the same directory UNTICKED.
Click Next.
For the Framework, keep .NET 6.0 (Long-term support) selected.
For the Authentication type, keep None selected.
Keep Configure for HTTPS ticked.
Keep Enable Docker unticked.
UNTICK Use controllers (uncheck to use minimal APIs). We use minimal APIs because they are easier to get into when learning ASP.NET.
Keep Enable OpenAPI support ticked. This allows us to auto-generate a website for our API.
Click Create.
Visual Studio opens up with out Solution opened. We're greeted by a welcome screen.
Feel free to close that welcome tab.
All right, so to the right in the Solution Explorer we see the ExampleWebAPI project.
It has some default code. Let's just run it to see what we get out of the box.
Press F5 to run the project.
Your browser should open up with an auto generated Swagger UI.
We see the project name and a default GET endpoint at the route of /weatherforecast.
Click that GET /weatherforecast to expand it.
Click Try it out.
Click Execute.
If you scroll down a bit you should see the response body, which should contain a bunch of WeatherForecast objects in JSON format.
Awesome. So that's what we get out of the box.
We can also access this data by just navigating to the weatherforecast endpoint route in the browser URL.
Now you should see something like https://localhost:7185/swagger/index.html.
The specific port numbers are probably different for you.
To call the endpoint, simply change that /swagger/index.html to /weatherforecast.
We now see that same JSON we got from calling the endpoint through Swagger.
If a different client, like a React application calls this endpoint they will get that same JSON data which they can then display in a beautiful UI.
All right so let's explore some of the code behind this.
Exploring the Project
Close the browser tab where you viewed the endpoint. This will stop the project from running.
If you expand the ExampleWebAPI project, you'll see 5 items under it.
We have Connected Services, which is an advanced feature you don't have to worry about for now.
We also have Dependencies, which contains the references to other people's code your project depends on. NuGet packages fall under this.
Then we have the Properties folder. Which contains a single file named launchSettings.json. In that file you can specify some settings as to how web servers should run your web API.
After that, we have the appsettings.json file. In this file you can specify application settings like how it should connect to a database (connection string).
Finally, we have Program.cs. Which is the most important C# file in most .NET applications.
Open Program.cs.
In a nutshell, what's happening in this file is the following: At line 1 the application gets initialized. This is where your web application first gets created.
From lines 3-6, dependency injection gets set up.
In a nutshell, dependency injection is a design pattern which offers a pretty clean way to set up dependencies for your code. These dependencies include other people's code, and your own. They mostly are NuGet packages, and many of those are maintained by Microsoft themselves.
Then, at line 8, your web application gets built. From that we get a configured web application.
At lines 10-17 the HTTP request pipeline gets set up, which determines how a HTTP request from a client, for example a React front end, should flow through your web API.
Don't worry about lines 19-22, this is simply where Microsoft sets up some example data for us to work with, so that we don't have an empty project.
At lines 24-36 the /weatherforecast endpoint we called gets created or in ASP.NET that's called the endpoint is being mapped.
The endpoint simply returns an array of WeatherForecast objects with random data, its model is declared at the end of Program.cs.
Then at line 38, your web application finally gets run. It sort of boots up when that line runs.
From lines 40-43 we see the example model we get when we call the /weatherforecast route.
Because we are using minimal APIs, this is all the code needed to run a full-featured web API. Very impressive because there's only 43 lines in it.
Building Our Own API
Let's now modify this project to suit our needs. I'll try to keep everything as simple as possible (adhering to the keep it simple, stupid (KISS) principle).
We'll go for a very simple Post model with just a few properties. We will store that model in a SQLite database, which is simply a file.
We'll generate that database from the model using Entity Framework Core. This is called a code-first approach.
Then we'll create API endpoints that allow a client to perform the Create, Read, Update and Delete (CRUD) operations on those Post models.
Let's get started.
Back in Visual Studio, right click the ExampleWebAPITest project and Add -> a New Folder.
Name it Data.
Right click Data and Add -> a New Folder.
Name it Models.
Right click Models and Add -> a Class....
Name it Post.
Click Add.
Below is the completed post model. Change the namespace to match your project name.
Post.cs
namespace ExampleWebAPI.Data.Models;

public class Post
{
    // Entity Framework knows this is the primary key because of conventions.
    public int Id { get; set; }

    // string.Empty is used to initialize this property to an empty string (just empty quotes: "") to avoid nullability warnings.
    public string Title { get; set; } = string.Empty;

    public string Content { get; set; } = string.Empty;

    public bool Published { get; set; }
}
We'll also add a variant of this Post model called a Data Transfer Object (DTO), which doesn't have the Id property.
That's because we only want to ask for parameters from clients we actually need, but if we create a post we don't need the Id.
If we create a post, we let Entity Framework fill in the Id for us. We let it auto increment the Id property.
Go ahead and create a new C# class in the Models folder and name it PostCreateDTO.
Replace its existing code with the code below. Change the namespace to your project name.
PostCreateDTO.cs
namespace ExampleWebAPI.Data.Models;

public class PostCreateDTO
{
    // string.Empty is used to initialize this property to an empty string (just empty quotes: "") to avoid nullability warnings.
    public string Title { get; set; } = string.Empty;

    public string Content { get; set; } = string.Empty;

    public bool Published { get; set; }
}
Ok, let's generate a database based on the Post model.
Generating the Database
To generate it, we need to add Entity Framework to our project and set it up.
To add the NuGet package, Right click ExampleWebAPI and click Manage NuGet Packages....
The NuGet tab opens up.
Click Browse.
Search for the following:
Microsoft.EntityFrameworkCore
Click the first result, keep the latest stable version selected and click Install.
Accept the license terms.
We need another package, so also search for:
microsoft.entityframeworkcore.sqlite
Click the first result, keep the latest stable version selected and click Install.
Accept the license terms.
Lastly, we need one more package. Search for:
Microsoft.EntityFrameworkCore.Design
Click the first result, keep the latest stable version selected and click Install.
Accept the license terms.
You can close all Visual Studio tabs now if you like (right click a tab -> click Close All Tabs).
Ok let's add a new class where we set up Entity Framework.
Right click the Data folder -> click Add -> Class....
We name this class AppNameDBContext by convention.
So for this tutorial let's name it AppDBContext.
Click Add.
The code below sets up Entity Framework for our project. It also generates some example data.
Replace the code in your class with the code below. Change the namespace to match your project name.
AppDBContext.cs
using ExampleWebAPI.Data.Models;
using Microsoft.EntityFrameworkCore;

namespace ExampleWebAPI.Data;

public class AppDBContext : DbContext
{
    // This represents a table in Entity Framework.
    public DbSet<Post> Posts => Set<Post>();

    public AppDBContext(DbContextOptions<AppDBContext> options) : base(options) { }

    protected override void OnModelCreating(ModelBuilder modelBuilder)
    {
        // Call the base version of this method, else we get an error later on.
        base.OnModelCreating(modelBuilder);

        // The code below adds some example data to our database.
        Post[] postsToSeed = new Post[6];

        for (int i = 1; i < 7; i++)
        {
            postsToSeed[i - 1] = new Post
            {
                Id = i,
                Title = $"Post {i}",
                Content = $"Seeded content for post {i}.",
                Published = true
            };
        }

        modelBuilder.Entity<Post>().HasData(postsToSeed);
    }
}
Let's now specify where we want our SQLite database to be generated. We'll do that by adding a connection string to appsettings.json.
Open ExampleWebAPI/appsettings.json.
Change it to match the code below.
appsettings.json
{
  "ConnectionStrings": {
    "DefaultConnection": "Data Source=./Data/AppDB.db"
  },
  "Logging": {
    "LogLevel": {
      "Default": "Information",
      "Microsoft.AspNetCore": "Warning"
    }
  },
  "AllowedHosts": "*"
}
Let's now make our project aware of this class. We'll do that using the built-in dependency injection framework.
Open Program.cs.
Add the snippet below to it, below the line builder.Services.AddSwaggerGen and import the required using statements using quick actions...
OR
Simply copy my entire file and only change 'using ExampleWebAPI.Data' to match your project name.
builder.Services.AddDbContext<AppDBContext>(options =>
    options.UseSqlite(builder.Configuration["ConnectionStrings:DefaultConnection"]));
Program.cs
using ExampleWebAPI.Data;
using Microsoft.EntityFrameworkCore;

var builder = WebApplication.CreateBuilder(args);

// Add services to the container.
// Learn more about configuring Swagger/OpenAPI at https://aka.ms/aspnetcore/swashbuckle
builder.Services.AddEndpointsApiExplorer();
builder.Services.AddSwaggerGen();

builder.Services.AddDbContext<AppDBContext>(options =>
    options.UseSqlite(builder.Configuration["ConnectionStrings:DefaultConnection"]));

var app = builder.Build();

// Configure the HTTP request pipeline.
if (app.Environment.IsDevelopment())
{
    app.UseSwagger();
    app.UseSwaggerUI();
}

app.UseHttpsRedirection();

var summaries = new[]
{
    "Freezing", "Bracing", "Chilly", "Cool", "Mild", "Warm", "Balmy", "Hot", "Sweltering", "Scorching"
};

app.MapGet("/weatherforecast", () =>
{
    var forecast = Enumerable.Range(1, 5).Select(index =>
       new WeatherForecast
       (
           DateTime.Now.AddDays(index),
           Random.Shared.Next(-20, 55),
           summaries[Random.Shared.Next(summaries.Length)]
       ))
        .ToArray();
    return forecast;
})
.WithName("GetWeatherForecast");

app.Run();

internal record WeatherForecast(DateTime Date, int TemperatureC, string? Summary)
{
    public int TemperatureF => 32 + (int)(TemperatureC / 0.5556);
}
Once you have that, you're ready to generate the database.
Open a Terminal (If you see none, click View -> Terminal).
cd into your web API project. For me the line to run is the following:
cd .\ExampleWebAPITest\
Let's add a Migration.
Run the following line:
dotnet ef migrations add FirstMigration -o "Data/Migrations"
If we now navigate to the ExampleWebAPI/Data/Migrations folder we should see 2 files.
One with the date and time + the migration name and one with 'Snapshot' in it.
Open the first file.
Near the beginning we see the method CreateTable. If you read through this file you'll notice that this is the file that contains the instructions as to how the database should be generated.
In the Up method, the "Posts" table gets created with example data. This will happen if we apply the migration.
In the Down method at the end, we see that the "Posts" table gets dropped (deleted from the database). This will happen if we roll back the migration.
Let's apply the migration.
In your Terminal, run the following command:
dotnet ef database update
If you now look in the Data folder, a file called AppDB.db should show up. This is your database.
I recommend opening it in a free software called DB Browser for SQLite.
You can just drag and drop your database from the Visual Studio Solution Explorer into the program.
If you do so, it should look similar to the image below. You can right click the image -> Open image in new tab to enlarge.
Keep in mind that I opened 2 instances of the app so that you can see multiple tabs.
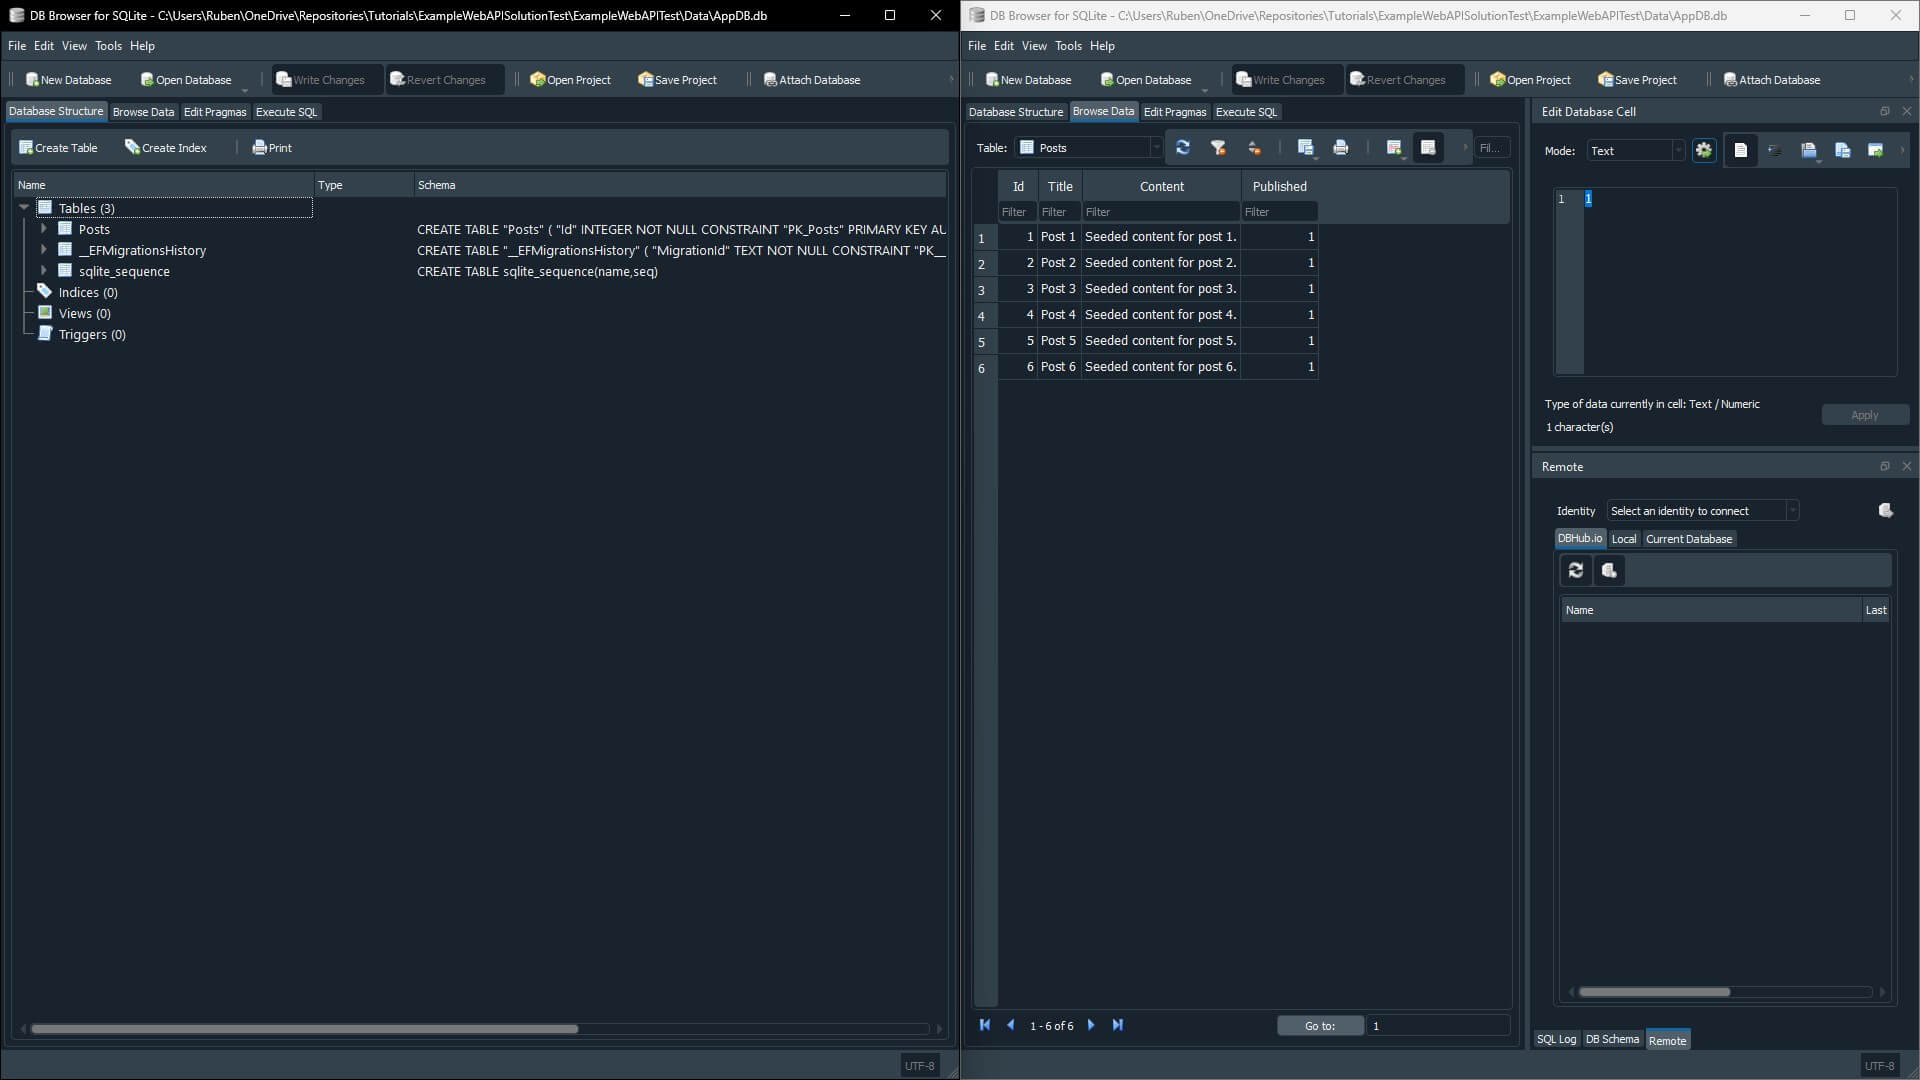
We see that a database has been generated with 3 tables, including Posts.
If so, awesome. Let's continue. If not, please ask for help in the comments below.
Implementing the GET endpoint (Read)
All right, with our database ready to go, let's implement the GET endpoint. The goal of this endpoint is to return all posts.
In Visual Studio, open Program.cs.
If you scroll down to line 30, you'll already see a GET endpoint.
With the new minimal hosting model, we can simply say app.Map HTTP VERB and with doing just that you have an API endpoint.
So let's get rid of the example code and implement our own GET endpoint that returns all the posts.
You can view my finished program.cs below. It now has even less lines of code.
Program.cs
using ExampleWebAPI.Data;
using ExampleWebAPI.Data.Models;
using Microsoft.EntityFrameworkCore;

var builder = WebApplication.CreateBuilder(args);

// Add services to the container.
// Learn more about configuring Swagger/OpenAPI at https://aka.ms/aspnetcore/swashbuckle
builder.Services.AddEndpointsApiExplorer();
builder.Services.AddSwaggerGen();

builder.Services.AddDbContext<AppDBContext>(options =>
    options.UseSqlite(builder.Configuration["ConnectionStrings:DefaultConnection"]));

var app = builder.Build();

// Configure the HTTP request pipeline.
if (app.Environment.IsDevelopment())
{
    app.UseSwagger();
    app.UseSwaggerUI();
}

app.UseHttpsRedirection();

// GET endpoint mapped to /posts. This method is asynchronous and uses dependency injection to get the AppDBContext dependency.
app.MapGet("/posts", async (AppDBContext dbContext) =>
{
    List<Post> allPosts = await dbContext.Posts.ToListAsync();
    return allPosts;
});

app.Run();
Go ahead and run the project with F5. Try out the GET /posts endpoint. You should get the seeded posts back.
Implementing the Other Endpoints
Ok now for the rest of the CRUD operations, go ahead and grab the code from the finished Program.cs below. Change the namespace to match your project name.
I also changed the Swagger UI to show itself when the app runs in a production environment at the root route, or the index. So no /swagger is needed in the route.
If any code is unclear, please ask in the comments below.
Program.cs
using ExampleWebAPI.Data;
using ExampleWebAPI.Data.Models;
using Microsoft.EntityFrameworkCore;

var builder = WebApplication.CreateBuilder(args);

// Add services to the container.
// Learn more about configuring Swagger/OpenAPI at https://aka.ms/aspnetcore/swashbuckle
builder.Services.AddEndpointsApiExplorer();
builder.Services.AddSwaggerGen();

builder.Services.AddDbContext<AppDBContext>(options =>
    options.UseSqlite(builder.Configuration["ConnectionStrings:DefaultConnection"]));

var app = builder.Build();

// Configure the HTTP request pipeline.
app.UseSwagger();
app.UseSwaggerUI(options =>
{
    // Set Swagger to run on the root route. No /swagger needed.
    options.SwaggerEndpoint("/swagger/v1/swagger.json", "Web API facilitating CRUD operations on the Posts table.");
    options.RoutePrefix = string.Empty;
});

app.UseHttpsRedirection();

// CREATE a post.
app.MapPost("/posts", async (PostCreateUpdateDTO postToCreateDTO, AppDBContext dbContext) =>
{
    Post postToCreate = new()
    {
        // Let Entity Framework Core automatically increment the ID.
        Id = 0,
        Title = postToCreateDTO.Title,
        Content = postToCreateDTO.Content,
        Published = postToCreateDTO.Published
    };

    dbContext.Posts.Add(postToCreate);

    bool changesPersistedToDB = await dbContext.SaveChangesAsync() > 0;

    if (changesPersistedToDB)
    {
        // Returns the route of the created object.
        return Results.Created($"/posts/{postToCreate.Id}", postToCreate);
    }
    else
    {
        return Results.BadRequest();
    }
});

// GET endpoint mapped to /posts. This method is asynchronous and uses dependency injection to get the AppDBContext dependency.
// READ all posts.
app.MapGet("/posts", async (AppDBContext dbContext) =>
{
    List<Post> allPosts = await dbContext.Posts.ToListAsync();
    return allPosts;
});

// READ a single post by id.
app.MapGet("/posts/{postId}", async (int postId, AppDBContext dbContext) =>
{
    Post? post = await dbContext.Posts.FindAsync(postId);

    if (post != null)
    {
        return Results.Ok(post);
    }
    else
    {
        return Results.NotFound();
    }
});

// UPDATE a post.
app.MapPut("/posts/{postId}", async (int postId, PostCreateUpdateDTO updatedPostDTO, AppDBContext dbContext) =>
{
    var postToUpdate = await dbContext.Posts.FindAsync(postId);

    if (postToUpdate == null)
    {
        return Results.NotFound();
    }

    postToUpdate.Title = updatedPostDTO.Title;
    postToUpdate.Content = updatedPostDTO.Content;
    postToUpdate.Published = updatedPostDTO.Published;

    bool changesPersistedToDB = await dbContext.SaveChangesAsync() > 0;

    if (changesPersistedToDB)
    {
        return Results.NoContent();
    }
    else
    {
        return Results.BadRequest();
    }
});

// DELETE a post.
app.MapDelete("/posts/{postId}", async (int postId, AppDBContext dbContext) =>
{
    Post? postToDelete = await dbContext.Posts.FindAsync(postId);

    if (postToDelete != null)
    {
        dbContext.Posts.Remove(postToDelete);

        bool changesPersistedToDB = await dbContext.SaveChangesAsync() > 0;

        if (changesPersistedToDB)
        {
            return Results.NoContent();
        }
        else
        {
            return Results.BadRequest();
        }
    }
    else
    {
        return Results.NotFound();
    }
});

app.Run();
Because we changed the Swagger route, we need to change the default route in development mode.
To do that open ExampleWebAPI/Properties/LaunchSettings.json.
At lines 16 and 25 you'll see a launchUrl entry.
Get rid of both of them, the entire line. An easy way is to triple click the line and hit Delete.
Save all your changes and go ahead and run the project with F5. Test all the endpoints if you like.
I recommend the following order:
- Create a post
- Get all posts
- Update the created post
- Get all posts again
- Deleting the created post
- Get all posts again
Publishing to Azure
You now have functioning minimal RESTful web API. Congratulations!
Let's publish it to the Microsoft Azure cloud for free.
We can do this easily from Visual Studio.
To get started, open Visual Studio.
Let's specify that we want our database to get sent up to Azure.
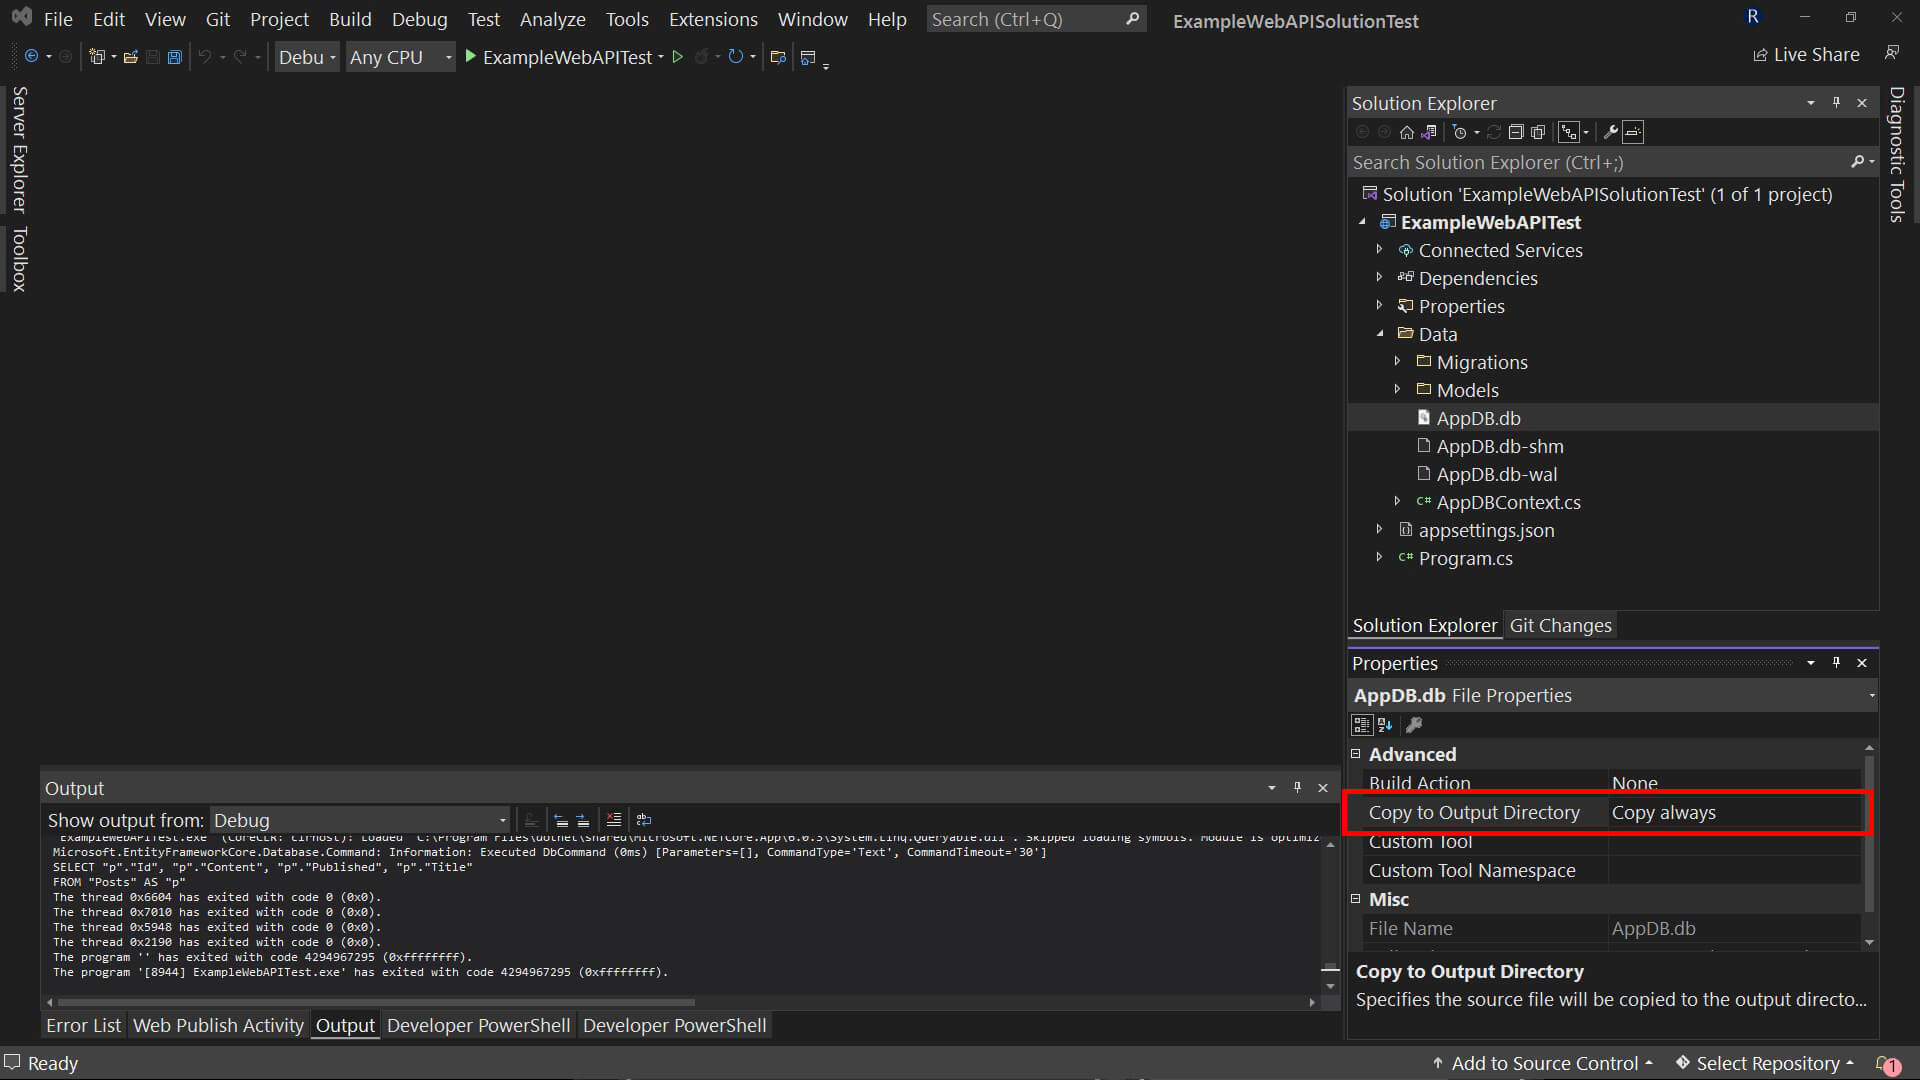
In the Solution Explorer, expand the Data folder.
Right click your AppDB.db and select Properties.
In the Properties window, which by default is in the bottom right corner, set the Copy to Output Directory field to Copy Always.
The screenshot below gives more information. To enlarge, right click the image and click Open image in new tab.
Now we're ready to publish to Azure and that process is very streamlined in Visual Studio.
Right click your web API project and select Publish....
Select Azure and hit Next.
We'll go for an Azure App Service Resource, with Windows as the operating system.
So select Azure App Service (Windows) and hit Next.
Click the little green plus on the right to create a new Azure App Service Resource.
For the Name, we automatically get the project name and the date and time.
Keep that, or change it to something more descriptive if you like.
Keep the Subscription name as Pay-As-You-Go.
For the Resource Group, I recommend selecting the one you put your learning apps in.
You can consider the Hosting Plan to be the thing our App Service Resource lives in. An App Service plan defines a set of compute resources for a web app to run. You can read up on Hosting Plans here.
Create a new Hosting Plan by clicking New....
By default, for its Name (labeled as Hosting Plan) you'll get your project name + Plan.
Keep that, or change it to something more descriptive if you like.
For the Location, select the one closest to you.
For the Size, scroll to the top and select Free.
Then click OK.
Click Create.
Azure is now going to work for you, creating all the Resources you requested. For me it usually takes less than 1 minute.
When created, keep Deploy as ZIP package UNCHECKED.
Click Next.
We won't be using API Management, so tick Skip this step in the bottom left.
Click Finish.
Click Publish in the top right corner.
There we go, that's everything we needed to do to get our web API to run on the Microsoft Azure cloud.
Wait for it to complete. This usually takes less than 3 minutes for me.
When it's done, your browser will open up and you should be greeted by an auto generated Swagger UI.
Feel free to test all the endpoints.
Now there's one last thing we need to do and that is to stop our development database from overriding our production database every time we publish the API to Azure.
To do that, go back to Visual Studio.
Go to your database properties again.
And set Copy to Output Directory to Do not copy.
That's all. Done!
Conclusion
I hope this little crash course helped you. If you read it all I want to thank you for your time and trust.
You have learned how ASP.NET works at a high level and some of its best-known sub-frameworks. We zoomed in on ASP.NET Web APIs and we implemented our own little REST API using the new minimal hosting model. We managed to implement the classic CRUD operations (Create, Read, Update and Delete) on a simple Post model. To finish it off, we published our web API to the Microsoft Azure cloud.
I'd love to hear your feedback and other thoughts in the comments below. You can just re-use your GitHub account to comment.
In the previous episode we built a serverless REST API using Azure Functions and we stored the data in Azure Cosmos DB.
This is the final episode for now, as people requested other standalone content way more than new Exploring .NET episodes so I'll listen to that.
Good luck on your developer journey!
Sources
Wikipedia - ASP.NET - https://en.wikipedia.org/wiki/ASP.NET
Wikipedia - SOAP - https://en.wikipedia.org/wiki/SOAP#:~:text=SOAP%20provides%20the%20Messaging%20Protocol,instances%20of%20application%2Ddefined%20datatypes
Wikipedia - REST - https://en.wikipedia.org/wiki/Representational_state_transfer
Indeed - What is ASP.NET? - https://www.indeed.com/career-advice/career-development/what-is-aspnet
PLURALSIGHT - Everything you need to know about C# - https://www.pluralsight.com/blog/software-development/everything-you-need-to-know-about-c-#
Brainspire - An Introduction to ASP.Net and Its Use Cases for Business Software - https://www.brainspire.com/blog/an-introduction-to-asp.net-and-its-use-cases-for-business-software
Wikipedia - Web API - https://en.wikipedia.org/wiki/Web_API
Wikipedia - Jargon - https://en.wikipedia.org/wiki/Jargon
Microsoft Docs - Web server implementations in ASP.NET Core - https://docs.microsoft.com/en-us/aspnet/core/fundamentals/servers/?view=aspnetcore-6.0&tabs=windows
Microsoft Docs - Introduction to projects and solutions - https://docs.microsoft.com/en-us/visualstudio/get-started/tutorial-projects-solutions?view=vs-2022#:~:text=A%20solution%20is%20simply%20a,projects%20that%20the%20solution%20contains.
WebAssembly website - https://webassembly.org/
Wikipedia - DOM - https://en.wikipedia.org/wiki/Document_Object_Model
Microsoft Docs - ASP.NET Core Blazor JavaScript interoperability (JS interop) - https://docs.microsoft.com/en-us/aspnet/core/blazor/javascript-interoperability/?WT.mc_id=dotnet-35129-website&view=aspnetcore-6.0
Wikipedia - Model-view-controller - https://en.wikipedia.org/wiki/Model%E2%80%93view%E2%80%93controller
Microsoft Docs - ASP.NET MVC - https://docs.microsoft.com/en-us/aspnet/mvc/
Microsoft Docs - ASP.NET Core MVC - https://docs.microsoft.com/en-us/aspnet/core/mvc/overview?view=aspnetcore-6.0
Microsoft Docs - Separation of concerns - https://docs.microsoft.com/en-us/dotnet/architecture/modern-web-apps-azure/architectural-principles#separation-of-concerns
Wikipedia - ASP.NET MVC - https://en.wikipedia.org/wiki/ASP.NET_MVC
Microsoft Docs - Dependency injection in ASP.NET Core - https://docs.microsoft.com/en-us/aspnet/core/fundamentals/dependency-injection?view=aspnetcore-6.0
Wikipedia - Create, read, update and delete - https://en.wikipedia.org/wiki/Create,_read,_update_and_delete
Microsoft Docs - Azure App Service plan overview - https://docs.microsoft.com/en-us/azure/app-service/overview-hosting-plans