Azure Cosmos DB + Functions App API (Exploring .NET E3)
Published on 2022-04-09 by Ruben Heeren
Introduction
In this entry of Exploring .NET you'll learn how to build a minimalistic CRUD microservices application using Azure Functions and Azure Cosmos DB. We'll implement the Create, Read, Update and Delete database operations you'll see in many code repositories.
In the previous episode the Microsoft Azure Cloud got introduced. In the next episode we'll take a look at the web part of .NET, focusing on the ASP.NET framework.
You can download the source code here.
If you’re new here, welcome! I’m Ruben and it’s my goal to help you learn Software Development with .NET.
Links to the sources I used can be found at the end of this blog post.
You can check out the live demo of the end result of this tutorial here.
By the way, my website now has dark mode available! Just select dark mode in your device settings and it will automatically switch.
If you prefer video content, check out the video version of this blog post below: <br> <br>
Prerequisites
<ul> <li>A free Azure account with a Pay-As-You-Go subscription or with free trial credit. I'll make sure you get as little bills as possible, all Resources from this tutorial should total less than $0.50.</li> <li>Visual Studio with the 'Azure development' workload installed. Version 2019 or higher recommended, I'll use 2022. I recommend the Windows version because I have heard VS for Mac can be buggy.</li> </ul>
Setting up a Cosmos DB Account
I'm assuming you have a free Azure account with a Pay-As-You-Go subscription or with free trial credit. If you don't have it yet, follow this guide.
Let's start by setting up our Cosmos DB Account. Go to the Azure Portal, sign in and click Create a resource.
Search for "Azure Cosmos DB", click the first result and hit Create.
For the workload, select Core (SQL) - Recommended. Click Create on that tile.
Then we see a screen with a bunch options, the first one being Subscription and below it Resource Group.
These two things play an important role in everything you do on Azure. Your Subscription is practically speaking your Azure account, which contains all the services you are using on Azure.
Microsoft decided that it would be nice to be able to group these services in 'folders'. In Azure we group the individual services called Resources (Functions, Virtual Machines etc.) in folders called Resource Groups.
Some companies create a group for each department and others create one for each application.
So let's create a new Resource Group for this tutorial.
Below the Resource Group selection dropdown just hit Create new.
Enter a descriptive name. This Resource Group will contain all the Resources for this tutorial. I'll name it ExploringAzure.
Having them all in one Resource Group also allows us to delete them all at once later.
Ok so that's filled in, then we need to fill in the Account Name for our Cosmos DB instance. It needs to be unique across Azure and all lowercase. I'll go for exploringazurecosmosaccount.
For the Location, select the one closest to you (or your customer). WARNING: some regions like West Europe are often overloaded. Switzerland North worked for me.
For the Capacity mode, select Provisioned throughput.
Provisioned throughput is ment for production apps where you can predict a certain number of constant stream of operations. Serverless is for autoscaling and way cheaper if you don't have many users.
However, Provisioned throughput has a free tier, and Serverless does not as far as I know. So that's why we use it.
Make sure you keep Apply Free Tier Discount on Apply.
Leave Limit total account throughput ticked.
The screenshot below shows my settings (right click -> Open in new tab to enlarge).

Ok let's continue.
At the bottom, click Next: Global Distribution.
Leave all the Global Distribution settings on disabled.
Click Next: Networking.
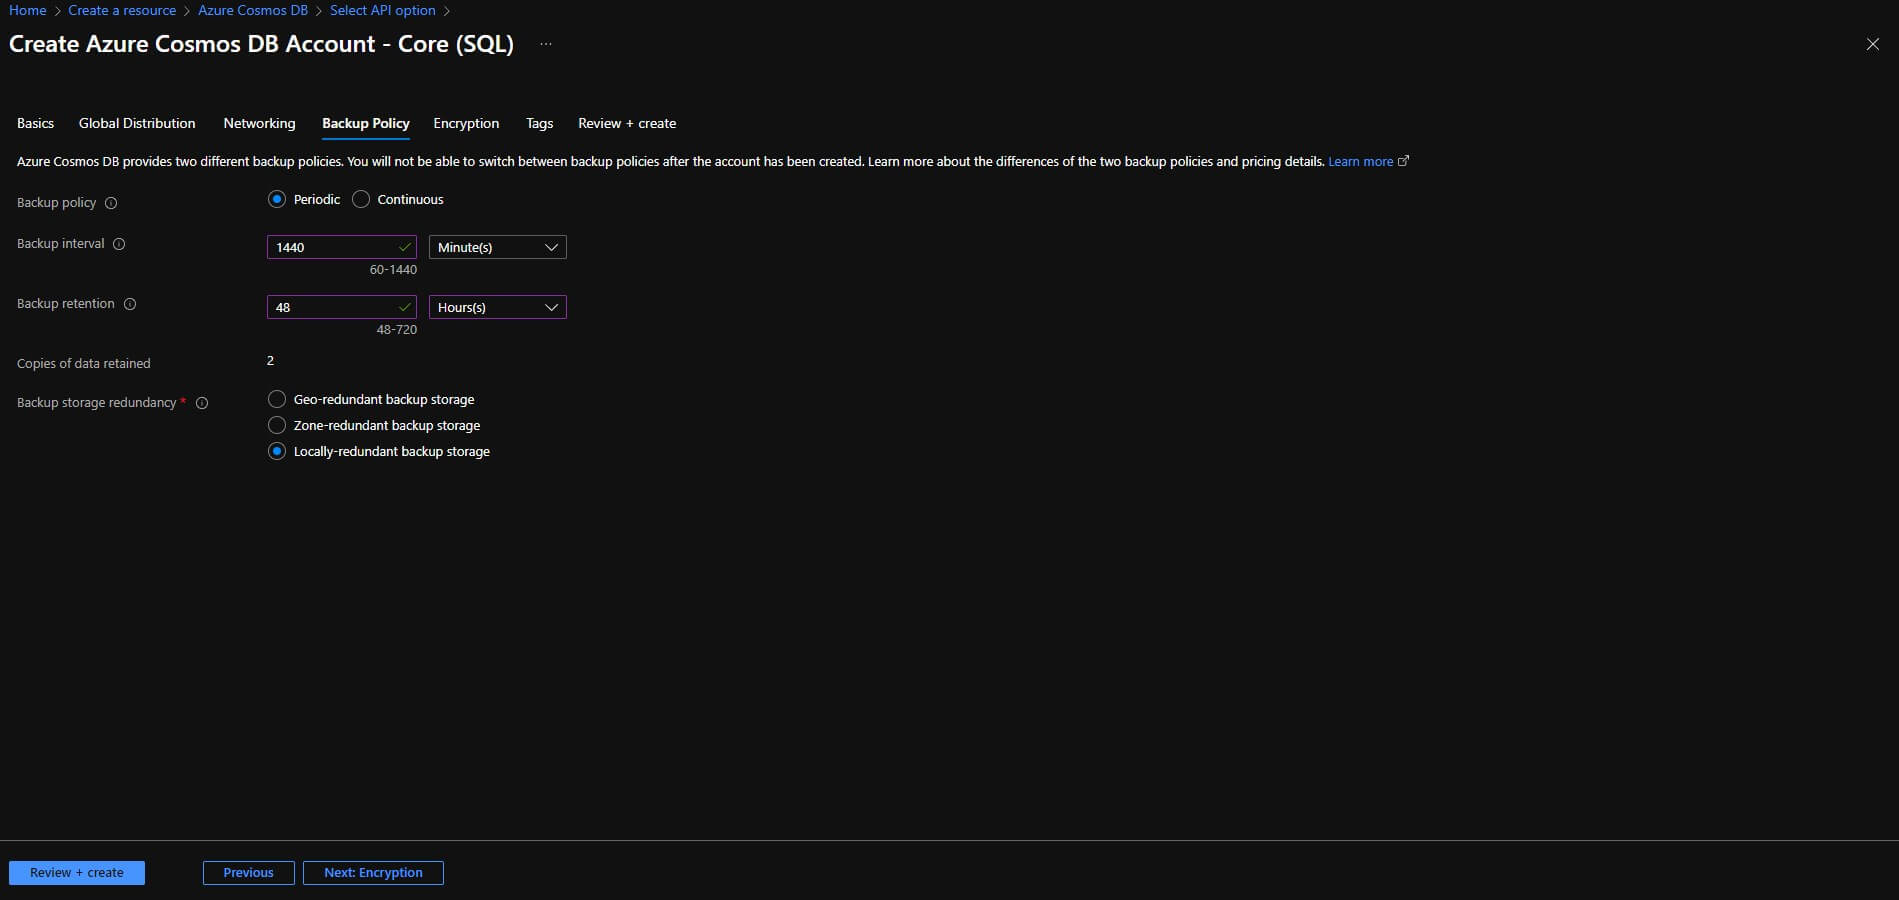
Leave All networks selected and click Next: Backup Policy.
This one is up to you. For this tutorial I'll go for the cheapest backup settings as shown in the image below (right click -> Open in new tab to enlarge).
Click Next: Encryption.
Leave the Service-managed key ticked.
Click Next: Tags.
This is mainly ment for billing purposes so that, for example, the right departments get billed. We don't need any tags for this tutorial.
So just click Next: Review + create.
Validate your settings and if everything looks good, hit Create.
This will start the creation process which for me usually takes about 3 minutes.
NOTE: this deployment can fail. It failed for me a couple of times while testing because the Azure Cosmos DB service was overloaded for West Europe. I've heard people from the US regions getting this error too. This is the error message I got:
Sorry, we are currently experiencing high demand in West Europe region, and cannot fulfill your request at this time. To request region access for your subscription, please follow this link https://aka.ms/cosmosdbquota for more details on how to create a region access request.
So I tried Switzerland North as the region and it worked. If you get this just try a bunch of different regions. Microsoft is aware of the problem. The only thing we can do is wait for a fix to come in.
Once our account is set up, we can create our Database and the Collection we need for this tutorial. We will do this in the Azure Portal.
Creating the Database and the Collection
On the 'Your deployment is complete' click Go to resource.
Then, in your Cosmos DB account, go to the Overview tab.
Click + Add Container.
A Container is comparable to a SQL table and we're going to use ONE container for ONE table. As far as I'm aware, a Container can contain multiple tables. Take a look at this MS Docs article for more information on Data modeling in Azure Cosmos DB.
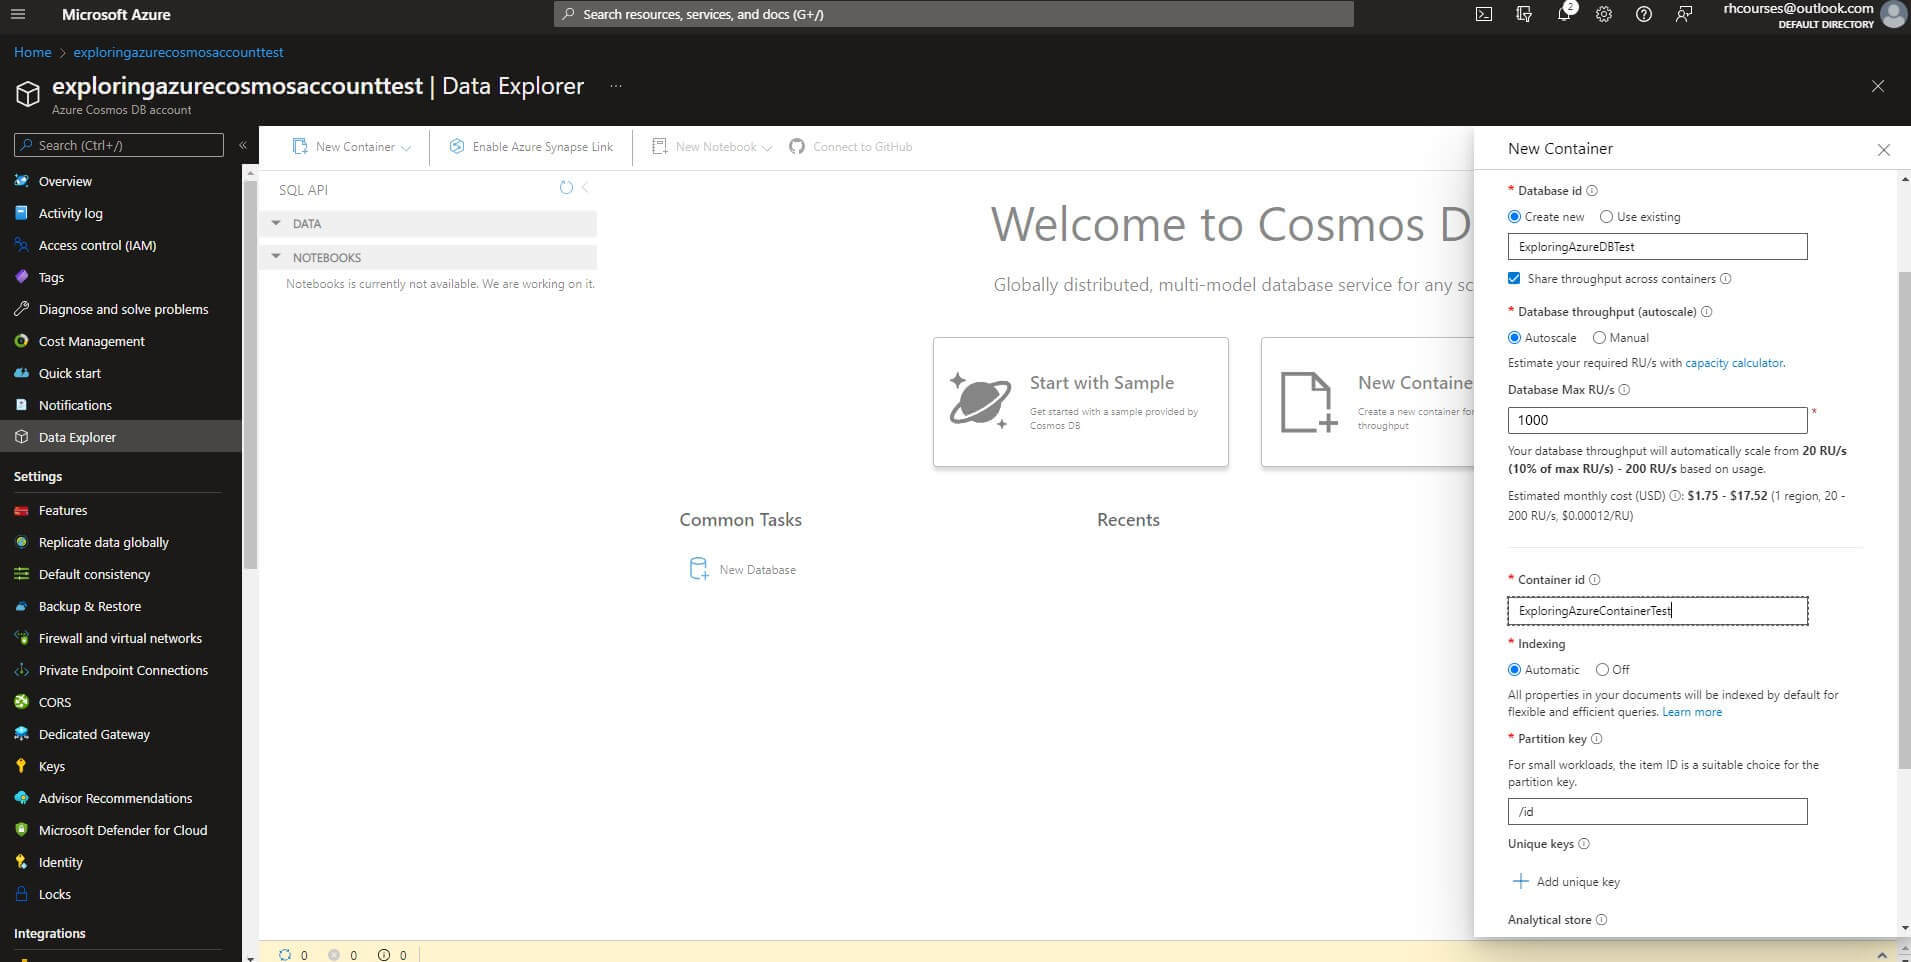
So a little form opens on the right where we can input some data.
For the Database id, leave Create new ticked. For its value, choose a descriptive name. I'll do ExploringAzureDB.
Leave Share throughput across containers ticked.
For the autoscaling, leave Autoscale ticked and set the Database Max RU/s to 1000. We shouldn't go above the free tier with that.
RU's stand for Request Units and that is what Microsoft uses to calculate usage and costs in Azure Cosmos DB. Take a look at this MS Docs article for more information on that.
Then, moving on to the Container settings.
For the Container id, choose a descriptive name. I'll do ExploringAzureContainer.
I'll leave the Indexing as Automatic.
I'll leave Partition key to the default value of /id.
We won't need any Unique keys.
I'll leave the Analytical store set to Off.
We don't need to touch anything in the Advanced tab.
You can compare your settings to mine in the image below (right click -> Open in new tab to enlarge).
Finally, hit Ok at the bottom.
Awesome! We now have our database, collection and account set up.
Creating the Functions App in Visual Studio
We'll now focus on setting up the Azure Functions app.
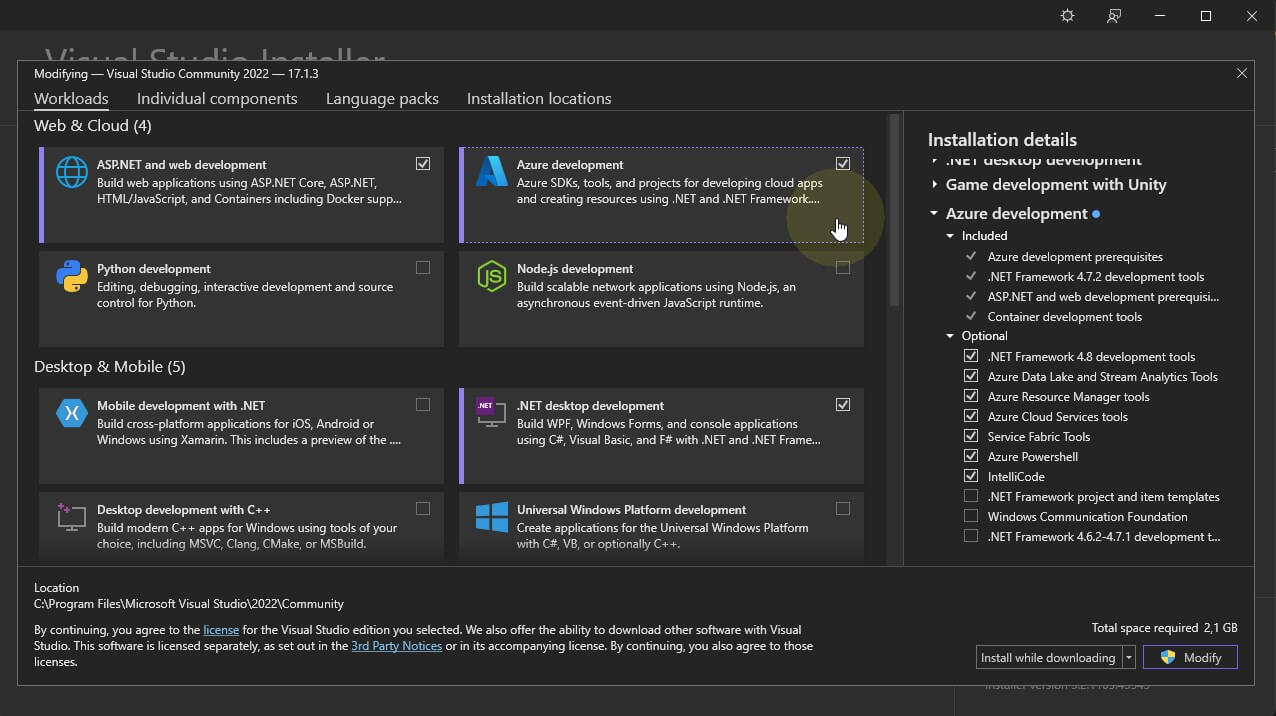
For this portion of the tutorial, I'll use Visual Studio Community 2022. Make sure the Azure development workload is installed.
If you need to install the workload go to the Visual Studio Installer -> Modify -> and tick Azure development.
The workload to install is shown in the image below (right click -> Open in new tab to enlarge).
Once that is installed open Visual Studio.
To create our Functions App, which will become a serverless API, hit Create a new project.
Search for "functions", select Azure Functions and hit Next.
For the Project name, choose a descriptive name. I'll do ExploringAzureFunctionsApp.
Pick the Location you want.
For the Solution name, pick a descriptive name, I'll do ExploringAzure.
This one is up to you, but I always leave Place solution and project in the same directory unticked.
Hit Create.
A little window will open up. In it we can select some more things.
Leave the first dropdown, which is the Runtime as .NET 6.
For the Storage account, keep it as Storage emulator.
For the Authorization level, set it to Anonymous, so that we don't need any credentials to call our Functions.
Then, hit Create.
Awesome! Our Functions App is now created.
Setting up the Functions App
Ok so we are greeted with a default Function called Function1.
The first thing I want to do is use file-scoped namespaces.
So to do that, put your cursor on namespace ExploringAzureFunctionsApp, hit Alt+Enter and then select Convert to file-scoped namespace.
We'll continue working on this class later.
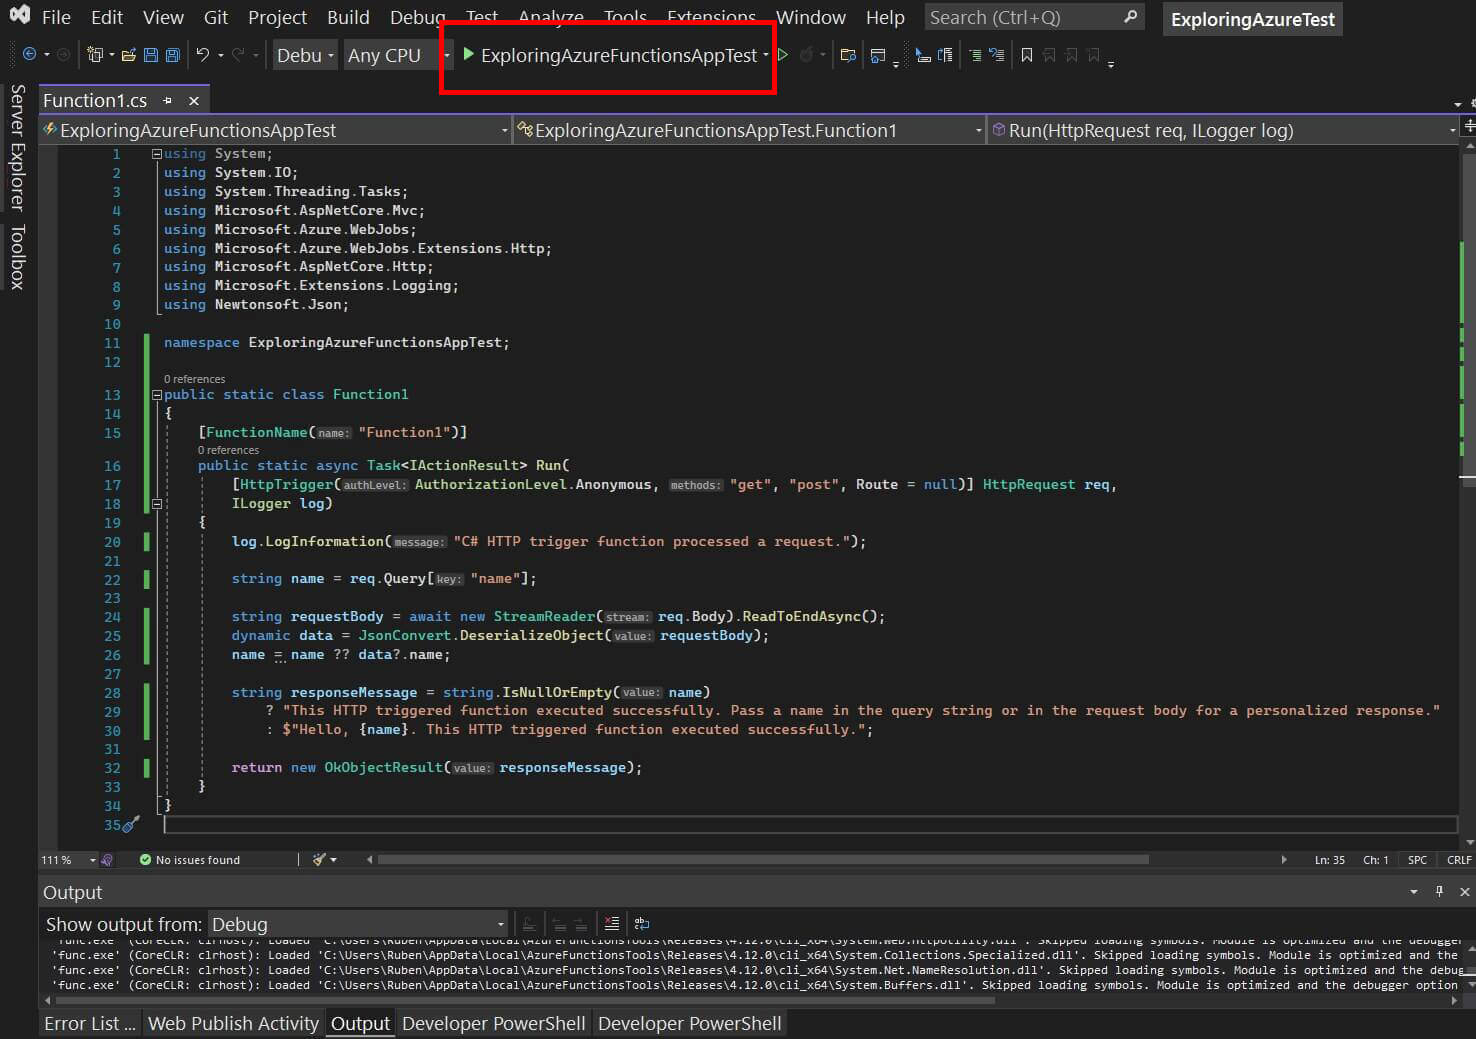
Let's just run the project to see if it works.
Press F5 or click the button at the top with the green arrow and the project name as seen in the image below (right click -> Open in new tab to enlarge).
A little console window opens up. This address may vary for you, but navigate to the running project in your browser.
For me it is http://localhost:7071/api/Function1 or http://localhost:7071/api/Function1?name=.NET-Dev.
If you are there, see if your function runs. You should see something similar to the following text:
This HTTP triggered function executed successfully. Pass a name in the query string or in the request body for a personalized response.
Awesome. So it works so far. Let's continue.
Close the browser window and the console window to stop the project from running.
Now, let's add a very simple Post model.
In Solution Explorer, right-click your Functions project, select Add -> New Folder. Name it Models.
Right click that Models folder and select Add -> Class. Name it Post.
I recommend removing all the namespaces since we now have implicit usings in .NET 6.
So Azure Cosmos DB uses JSON to move and store data. You can use the JsonProperty attribute to control how JSON serializes and deserializes objects. Our Post class demonstrates the JsonProperty attribute. This code controls the format of the property name that goes into JSON. It also renames the .NET property Published.
Let's add a few properties:
Post.cs
using Newtonsoft.Json;

namespace ExploringAzureFunctionsApp.Models;

internal class Post
{
    [JsonProperty(PropertyName = "id")]
    public string Id { get; set; }

    [JsonProperty(PropertyName = "title")]
    public string Title { get; set; }

    [JsonProperty(PropertyName = "content")]
    public string Content { get; set; }

    [JsonProperty(PropertyName = "isPublished")]
    public bool Published { get; set; }
}
<br> Ok so that's our model done.
Setting Up Our Functions App To Talk With Cosmos DB
Now we'll focus on the communication between Azure Functions and Azure Cosmos DB.
We will let Cosmos DB know 'who we are' by providing something called a Connection String. And for those that don't know what that is, a connection string is a string (piece of text) that specifies information about a data source and the means of connecting to it.
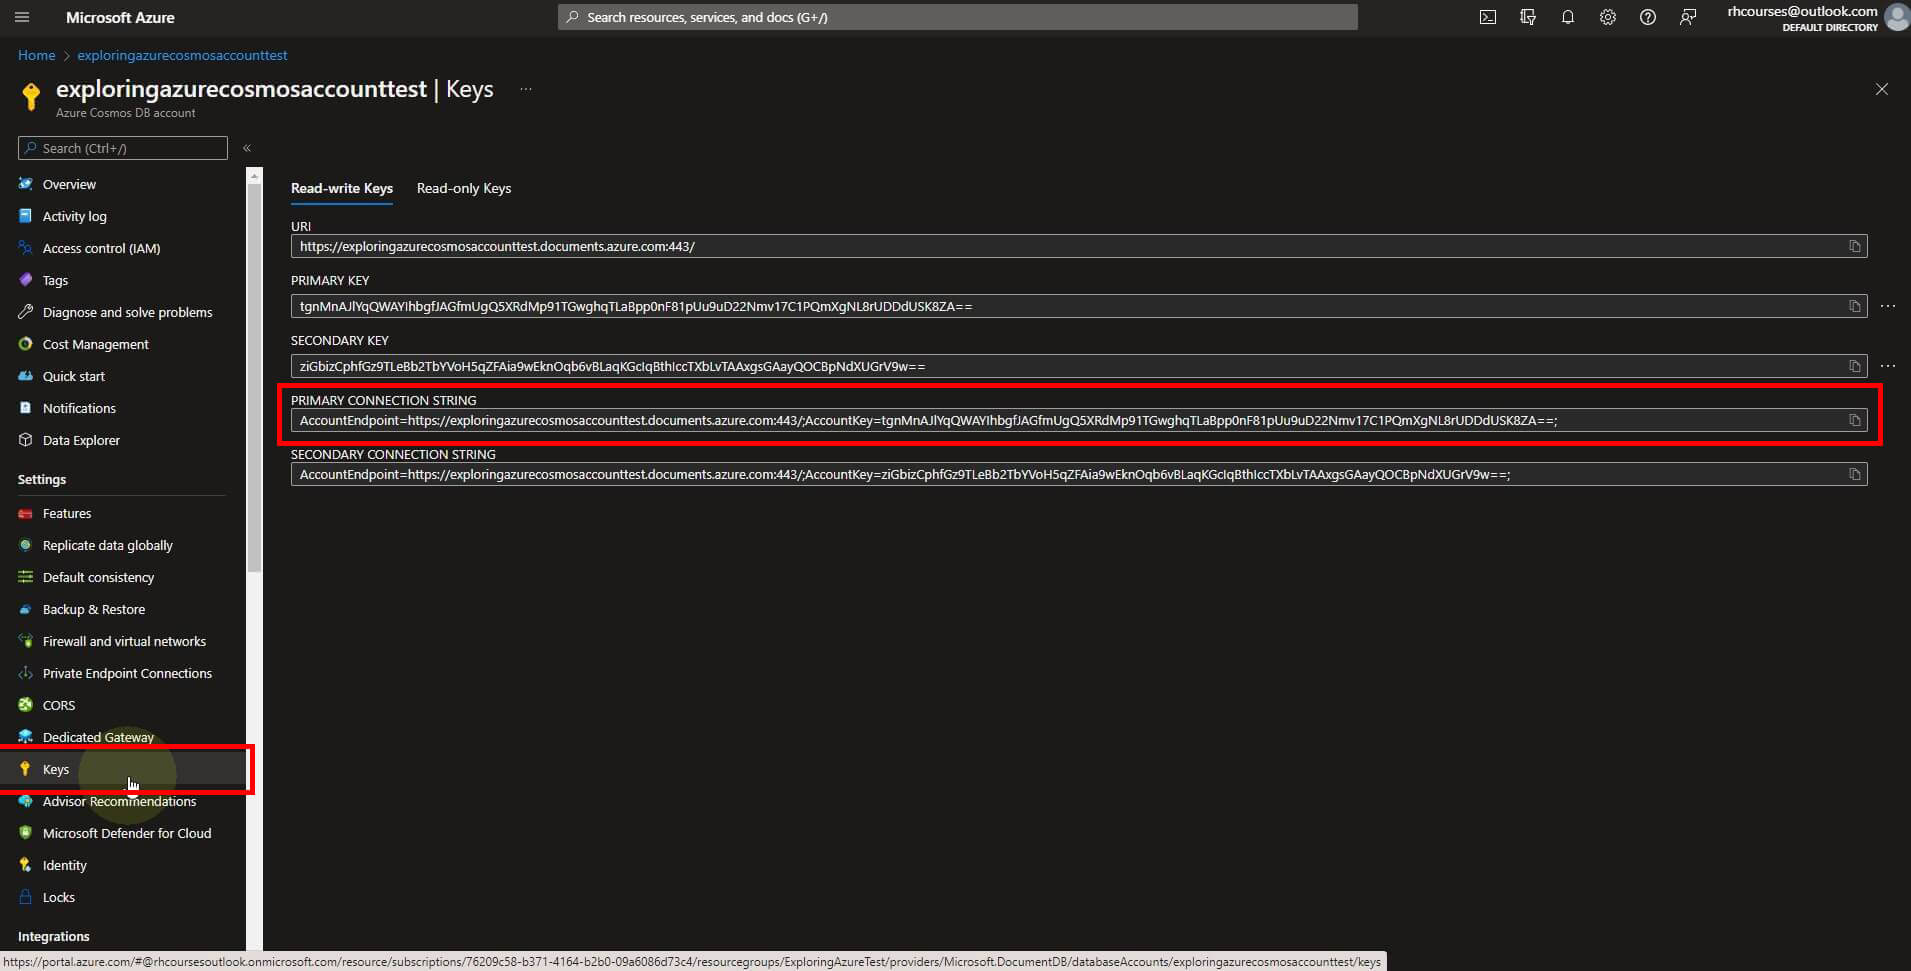
Ok so we can get that connection string from the Azure Portal.
Go to the Azure Portal.
Open your Azure Cosmos DB Account Resource.
Go to the Keys tab. For this tutorial, we'll use the PRIMARY CONNECTION STRING.
Take a look at the image below for where to go (right click -> Open in new tab to enlarge).
Ok keep that Azure tab open and go back to Visual Studio.
We can store this connection string in a settings file called local.settings.json. That will work locally. When we publish our Functions App to Azure, we need to add it there in the Configuration.
Open local.settings.json.
And we need to add the connection string to it. It needs to look like this:
local.settings.json
{
  "IsEncrypted": false,
  "Values": {
    "AzureWebJobsStorage": "UseDevelopmentStorage=true",
    "FUNCTIONS_WORKER_RUNTIME": "dotnet"
  },
  "ConnectionStrings": {
    "CosmosDbConnectionString": "replace-with-your-connection-string"
  }
}
Ok let's fill in the connection string.
Go back to the Azure Portal tab, at the connection strings page.
And copy that PRIMARY CONNECTION STRING (there's copy button at the end of the box).
Then go back to Visual Studio.
And replace that replace-with-your-connection-string with your connection string.
It should look something like this:
local.settings.json
{
  "IsEncrypted": false,
  "Values": {
    "AzureWebJobsStorage": "UseDevelopmentStorage=true",
    "FUNCTIONS_WORKER_RUNTIME": "dotnet"
  },
  "ConnectionStrings": {
    "CosmosDbConnectionString": "AccountEndpoint=https://exploringazurecosmosaccounttest.documents.azure.com:443/;AccountKey=tgnMnAJlYqQWAYIhbgfJAGfmUgQ5XRdMp91TGwghqTLaBpp0nF81pUu9uD22Nmv17C1PQmXgNL8rUDDdUSK8ZA==;"
  }
}
Ok so that's done.
We are almost able to talk to Cosmos DB now.
Because we are using an Azure Cosmos DB output binding, we must have the corresponding bindings extension installed before you run the project.
By the way, if you want to read up on Azure Functions triggers and bindings, check out this MS Docs link.
With the exception of HTTP and timer triggers, bindings are implemented as extension packages.
So we need to install a NuGet package.
In Visual Studio, in the Solution Explorer, right click your Functions project.
Select Manage NuGet Packages....
Go to Browse.
Search for Microsoft.Azure.WebJobs.Extensions.CosmosDB.
Select it and hit Install. Accept the license.
Ok so now, we can add the Azure Cosmos DB output binding to our project.
In Functions, each type of binding requires a direction, type, and a unique name to be defined in the function.json file. The way you define these attributes depends on the language of your function app.
In a C# class library project, the bindings are defined as binding attributes on the function method. The function.json file required by Functions is then auto-generated based on these attributes.
That means we can get away with having just a C# file!
Open Function1.cs.
We need to add some code to the Run method in there. It's probably easier if you copy the whole thing though.
This is the snippet:
[CosmosDB(databaseName: "my-database", collectionName: "my-container",
    ConnectionStringSetting = "CosmosDbConnectionString"
    )]IAsyncCollector<dynamic> documentsOut,
This is the snippet explanation from the Microsoft Docs: The documentsOut parameter is an IAsyncCollector<T> type, which represents a collection of JSON documents that are written to your Azure Cosmos DB container when the function completes. Specific attributes indicate the names of the container and its parent database. The connection string for your Azure Cosmos DB account is set by the ConnectionStringSettingAttribute
And this is the full resulting function:
Function1.cs
using System;
using System.IO;
using System.Threading.Tasks;
using Microsoft.AspNetCore.Mvc;
using Microsoft.Azure.WebJobs;
using Microsoft.Azure.WebJobs.Extensions.Http;
using Microsoft.AspNetCore.Http;
using Microsoft.Extensions.Logging;
using Newtonsoft.Json;

namespace ExploringAzureFunctionsApp;

public static class Function1
{
    [FunctionName("Function1")]
    public static async Task<IActionResult> Run(
        [HttpTrigger(AuthorizationLevel.Anonymous, "get", "post", Route = null)] HttpRequest req,
        [CosmosDB(
            databaseName: "my-database",
            collectionName: "my-container",
            ConnectionStringSetting = "CosmosDbConnectionString")]
        IAsyncCollector<dynamic> documentsOut,
        ILogger log)
    {
        log.LogInformation("C# HTTP trigger function processed a request.");

        string name = req.Query["name"];

        string requestBody = await new StreamReader(req.Body).ReadToEndAsync();
        dynamic data = JsonConvert.DeserializeObject(requestBody);
        name = name ?? data?.name;

        string responseMessage = string.IsNullOrEmpty(name)
            ? "This HTTP triggered function executed successfully. Pass a name in the [query string](https://website.com) or in the request body for a personalized response."
            : $"Hello, {name}. This HTTP triggered function executed successfully.";

        return new OkObjectResult(responseMessage);
    }
}
Ok, once you have that, change the values of databaseName and collectionName to the values you created in the chapter Creating the Database and Collection.
The ConnectionStringSetting's value can remain unchanged because we added that exact same key to the settings file.
For me it looks as follows:
Function1.cs snippet
[CosmosDB(
            databaseName: "ExploringAzureDBTest",
            collectionName: "ExploringAzureContainerTest",
            ConnectionStringSetting = "CosmosDbConnectionString")]IAsyncCollector<dynamic> documentsOut,
Now let's add some code the makes it so that a Post gets created when this Function runs.
And we'll use the IAsyncCollector documentsOut we added to the Run method for that.
We'll use the following snippet:
Post testPostToAdd = new()
{
    // Create a random ID.
    Id = Guid.NewGuid().ToString(),
    Title = "Test Title",
    Content = "Test Content",
    Published = true
};

// Add a JSON document to the output container.
await documentsOut.AddAsync(testPostToAdd);
<br> You can see the resulting Function below.
When this Function runs, a test Post object will be created and stored in our Cosmos DB database.
Function1.cs
using System;
using System.IO;
using System.Threading.Tasks;
using Microsoft.AspNetCore.Mvc;
using Microsoft.Azure.WebJobs;
using Microsoft.Azure.WebJobs.Extensions.Http;
using Microsoft.AspNetCore.Http;
using Microsoft.Extensions.Logging;
using Newtonsoft.Json;
using ExploringAzureFunctionsApp.Models;

namespace ExploringAzureFunctionsApp;

public static class Function1
{
    [FunctionName("Function1")]
    public static async Task<IActionResult> Run(
        [HttpTrigger(AuthorizationLevel.Anonymous, "get", "post", Route = null)] HttpRequest req,
        [CosmosDB(
            databaseName: "ExploringAzureDBTest",
            collectionName: "ExploringAzureContainerTest",
            ConnectionStringSetting = "CosmosDbConnectionString")]
        IAsyncCollector<dynamic> documentsOut,
        ILogger log)
    {
        log.LogInformation("C# HTTP trigger function processed a request.");

        string name = req.Query["name"];

        string requestBody = await new StreamReader(req.Body).ReadToEndAsync();
        dynamic data = JsonConvert.DeserializeObject(requestBody);
        name = name ?? data?.name;

        Post testPostToAdd = new()
        {
            // Create a random ID.
            Id = Guid.NewGuid().ToString(),
            Title = "Test Title",
            Content = "Test Content",
            Published = true
        };

        // Add a JSON document to the output container.
        await documentsOut.AddAsync(testPostToAdd);

        string responseMessage = string.IsNullOrEmpty(name)
            ? "This HTTP triggered function executed successfully. Pass a name in the [query string](https://website.com) or in the request body for a personalized response."
            : $"Hello, {name}. This HTTP triggered function executed successfully.";

        return new OkObjectResult(responseMessage);
    }
}
Trying Out the Functions App
Let's see if it works.
In Visual Studio, run the Functions App with F5.
Go to your Function1 endpoint in your browser, for me the URL is http://localhost:7071/api/Function1.
You should see something like this:
This HTTP triggered function executed successfully. Pass a name in the query string or in the request body for a personalized response.
That means it worked. Yay!
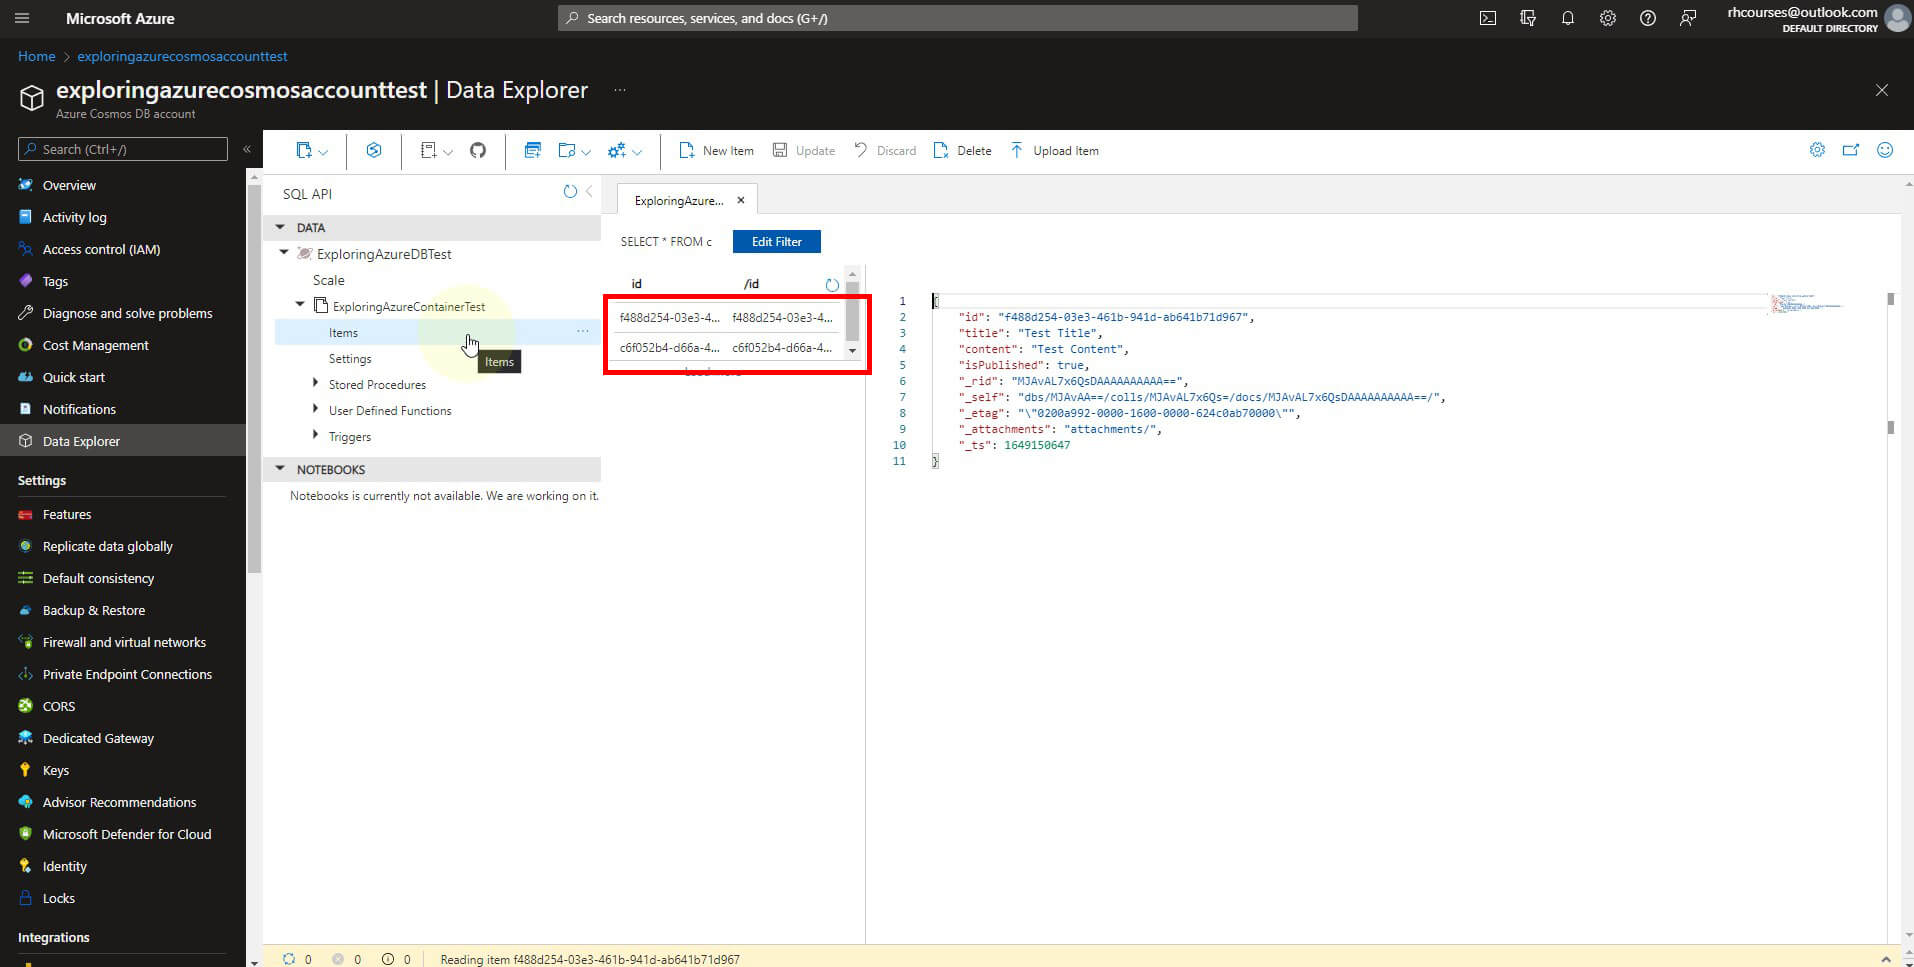
Let's check our database to see if a post has been added.
Go to the Azure Portal.
Navigate to your Azure Cosmos DB account Resource.
Navigate to Data Explorer.
Select Items, as seen in the screenshot below. The created Post will show up in the marked area. Select it to see its data.
Awesome! So the basic plumbing is done. Let's now make everything cleaner and implement all the CRUD operations.
Implementing the CRUD Operations
So to start off, go back to Visual Studio and stop the project from running.
The CreatePost Function
Let's create a new Function for creating Posts. To put the cherry on top, we'll also add an auto generated OpenAPI Swagger UI.
You can use Postman or similar tools for testing your serverless API if you prefer.
Ok so in Visual Studio, right click your Functions project -> Add -> New Azure Function.
Name it CreatePost.
Click Add.
Select Http trigger with OpenAPI.
Set the Authorization level to Anonymous.
Finally, click Add.
Ok so the CreatePost Function opens up.
Let's make it a file-scoped namespace again (alt enter namespace and use quick actions).
And we see that this has the same example code with a few OpenApi attributes added.
Right so let's re-use some code from Function1.
Open Function1.cs.
Copy the CosmosDB attribute and IAsyncCollector part of the Run method.
This should be on your clipboard (with your credentials):
[CosmosDB(
            databaseName: "ExploringAzureDBTest",
            collectionName: "ExploringAzureContainerTest",
            ConnectionStringSetting = "CosmosDbConnectionString")]
        IAsyncCollector<dynamic> documentsOut
Go back to CreatePost.cs.
Modify the Run method declaration to the following (with your credentials):
public async Task<IActionResult> Run(
        [HttpTrigger(AuthorizationLevel.Anonymous, "get", "post", Route = null)]
        HttpRequest req,
        [CosmosDB(
            databaseName: "ExploringAzureDBTest",
            collectionName: "ExploringAzureContainerTest",
            ConnectionStringSetting = "CosmosDbConnectionString")]
        IAsyncCollector<dynamic> documentsOut)
Ok now we need one more thing from Function1.cs, so let's go back to it
Copy the following snippet from it (or copy it below):
Post testPostToAdd = new()
{
    // Create a random ID.
    Id = Guid.NewGuid().ToString(),
    Title = "Test Title",
    Content = "Test Content",
    Published = true
};

// Add a JSON document to the output container.
await documentsOut.AddAsync(testPostToAdd);
Go back to CreatePost.cs
And paste it in the same place, above responseMessage.
Alt enter all the red squiggles and import the using statements with quick actions.
using System;
using YourProjectName.Models;
I recommend saving CreatePost.cs now.
Ok now we can close Function1.cs and delete it.
In Solution Explorer, just right click Function1.cs and select Delete, then select Ok.
Let's run the project again with F5 to check out the Swagger UI.
The terminal opens up and we see 5 functions now. We can view our UI at the last one.
So open that URL (CTRL + Click in Windows Terminal). For me the URL is http://localhost:7071/api/swagger/ui.
You should see your auto generated Swagger UI now. Let's run our Function.
Click the GET /CreatePost bar to expand it.
Click Try it out.
Fill in the Name parameter.
Click Execute.
You should get a 200 OK response back with text similar to this:
Hello, Name. This HTTP triggered function executed successfully.
Awesome so we know it works, let's finish the CreatePost function.
Close the Swagger UI tab and the terminal.
Go back to Visual Studio.
What I want to do, is get all the data to create the Post with from the query string in the URL.
Then use that data to create a new Post in CosmosDB.
For reference: each Post model will get stored as a Document in Azure Cosmos DB, because it is a document database. Azure also sometimes gives these Documents the name Items.
So let's add a few parameter attributes (replace the existing one with these):
[OpenApiParameter(name: "title", In = ParameterLocation.Query, Required = true, Type = typeof(string), Description = "The **Title** parameter")]
[OpenApiParameter(name: "content", In = ParameterLocation.Query, Required = true, Type = typeof(string), Description = "The **Content** parameter")]
[OpenApiParameter(name: "published", In = ParameterLocation.Query, Required = true, Type = typeof(string), Description = "The **Published** parameter")]
We will use the value of these to create the post. I have also cleaned up the rest of the code.
Below is my finished CreatePost Function, you can copy and paste it, just change databaseName and collectionName to your values.
CreatePost.cs
using System;
using System.Net;
using System.Threading.Tasks;
using ExploringAzureFunctionsApp.Models;
using Microsoft.AspNetCore.Http;
using Microsoft.AspNetCore.Mvc;
using Microsoft.Azure.WebJobs;
using Microsoft.Azure.WebJobs.Extensions.Http;
using Microsoft.Azure.WebJobs.Extensions.OpenApi.Core.Attributes;
using Microsoft.Extensions.Logging;
using Microsoft.OpenApi.Models;

namespace ExploringAzureFunctionsApp;

public class CreatePost
{
    private readonly ILogger<CreatePost> _logger;

    public CreatePost(ILogger<CreatePost> log)
    {
        _logger = log;
    }

    [FunctionName("CreatePost")]
    [OpenApiOperation(operationId: "Run", tags: new[] { "Create post" })]
    [OpenApiParameter(name: "title", In = ParameterLocation.Query, Required = true, Type = typeof(string), Description = "The **Title** parameter")]
    [OpenApiParameter(name: "content", In = ParameterLocation.Query, Required = true, Type = typeof(string), Description = "The **Content** parameter")]
    [OpenApiParameter(name: "published", In = ParameterLocation.Query, Required = true, Type = typeof(bool), Description = "The **Published** parameter")]
    [OpenApiResponseWithBody(statusCode: HttpStatusCode.OK, contentType: "text/plain", bodyType: typeof(string), Description = "The OK response")]
    public async Task<IActionResult> Run(
        [HttpTrigger(AuthorizationLevel.Anonymous, "post", Route = null)]
        HttpRequest httpRequest,
        [CosmosDB(
            databaseName: "ExploringAzureDBTest",
            collectionName: "ExploringAzureContainerTest",
            ConnectionStringSetting = "CosmosDbConnectionString")]
        IAsyncCollector<dynamic> documentsOut)
    {
        _logger.LogInformation($"C# HTTP trigger function processed a request. Function name: {nameof(CreatePost)}");

        string title = httpRequest.Query["title"];
        string content = httpRequest.Query["content"];
        bool published = bool.Parse(httpRequest.Query["published"]);

        Post postToCreate = new()
        {
            // Create a random ID.
            Id = Guid.NewGuid().ToString(),
            Title = title,
            Content = content,
            Published = published
        };

        // Add a JSON document to the output container.
        await documentsOut.AddAsync(postToCreate);

        string responseMessage = "Function triggered successfully. If the data was clean, the post has been created.";

        return new OkObjectResult(responseMessage);
    }
}
Go ahead and run that, check Azure Cosmos DB afterwards to see if your post shows up.
The DeletePost Function
Next, we'll implement the DeletePost Function.
For that, I think it is easiest to copy and paste CreatePost.cs.
So in Solution Explorer, click CreatePost.cs and then CTRL C + CTRL V.
Open CreatePost - Copy.cs.
Click somewhere in the file and hit CTRL + F.
Makes sure Match case is on (ALT + C).
Set it to Current document.
At Find, fill in CreatePost.
At Replace, fill in DeletePost.
Hit ALT + A to execute it.
Now in Solution Explorer, click CreatePost - Copy.cs and hit F2 to rename it, rename it to DeletePost.
Ok there we go.
So delete works a little different. First we need to get the Post to delete as a Document type. A Document is a single item in Cosmos DB.
Then, we tell Cosmos DB to delete it.
In the interest of time, I'll give you my finished DeletePost.cs. Just change the values of databaseName and collectionName to yours.
Keep in mind that for us, the PartitionKey is the same as the Post id.
DeletePost.cs
using System.Net;
using System.Threading.Tasks;
using Microsoft.AspNetCore.Http;
using Microsoft.AspNetCore.Mvc;
using Microsoft.Azure.Documents;
using Microsoft.Azure.Documents.Client;
using Microsoft.Azure.WebJobs;
using Microsoft.Azure.WebJobs.Extensions.Http;
using Microsoft.Azure.WebJobs.Extensions.OpenApi.Core.Attributes;
using Microsoft.Extensions.Logging;
using Microsoft.OpenApi.Models;

namespace ExploringAzureFunctionsApp;

public class DeletePost
{
    private readonly ILogger<DeletePost> _logger;

    public DeletePost(ILogger<DeletePost> log)
    {
        _logger = log;
    }

    [FunctionName("DeletePost")]
    [OpenApiOperation(operationId: "Run", tags: new[] { "Delete post" })]
    [OpenApiParameter(name: "id", In = ParameterLocation.Query, Required = true, Type = typeof(string), Description = "The **ID** parameter")]
    [OpenApiResponseWithBody(statusCode: HttpStatusCode.OK, contentType: "text/plain", bodyType: typeof(string), Description = "The OK response")]
    public async Task<IActionResult> Run(
        [HttpTrigger(AuthorizationLevel.Anonymous, "delete", Route = null)]
        HttpRequest httpRequest,
        [CosmosDB(
            databaseName: "ExploringAzureDBTest",
            collectionName: "ExploringAzureContainerTest",
            Id = "{Query.id}",
            PartitionKey = "{Query.id}",
            ConnectionStringSetting = "CosmosDbConnectionString")] Document document,
        [CosmosDB(
            databaseName: "ExploringAzureDBTest",
            collectionName: "ExploringAzureContainerTest",
            ConnectionStringSetting = "CosmosDbConnectionString")] DocumentClient client
        )
    {
        _logger.LogInformation($"C# HTTP trigger function processed a request. Function name: {nameof(DeletePost)}");

        string id = httpRequest.Query["id"];

        if (document == null || string.IsNullOrEmpty(id))
        {
            return new BadRequestResult();
        }

        await client.DeleteDocumentAsync(document.SelfLink, new RequestOptions() { PartitionKey = new PartitionKey(id) });

        return new OkResult();
    }
}
To test it, run the project again, go to Swagger UI and test the delete endpoint with an id from a post we viewed in the data explorer, in the Azure Portal.
The UpdatePost Function
Next up, we'll implement updating posts.
Go ahead and create a new C# file and name it UpdatePost.cs.
Replace its contents with the code below, which I will explain in a second.
As always change the databaseName and collectionName to your values.
UpdatePost.cs
using System.Net;
using System.Threading.Tasks;
using Microsoft.AspNetCore.Http;
using Microsoft.AspNetCore.Mvc;
using Microsoft.Azure.Documents;
using Microsoft.Azure.Documents.Client;
using Microsoft.Azure.WebJobs;
using Microsoft.Azure.WebJobs.Extensions.Http;
using Microsoft.Azure.WebJobs.Extensions.OpenApi.Core.Attributes;
using Microsoft.Extensions.Logging;
using Microsoft.OpenApi.Models;

namespace ExploringAzureFunctionsApp;

public class UpdatePost
{
    private readonly ILogger<UpdatePost> _logger;

    public UpdatePost(ILogger<UpdatePost> log)
    {
        _logger = log;
    }

    [FunctionName("UpdatePost")]
    [OpenApiOperation(operationId: "Run", tags: new[] { "Update post" })]
    [OpenApiParameter(name: "id", In = ParameterLocation.Query, Required = true, Type = typeof(string), Description = "The **ID** parameter")]
    [OpenApiParameter(name: "new-title", In = ParameterLocation.Query, Required = true, Type = typeof(string), Description = "The **New Title** parameter")]
    [OpenApiParameter(name: "new-content", In = ParameterLocation.Query, Required = true, Type = typeof(string), Description = "The **New Content** parameter")]
    [OpenApiParameter(name: "new-published", In = ParameterLocation.Query, Required = true, Type = typeof(bool), Description = "The **New Published** parameter")]
    [OpenApiResponseWithBody(statusCode: HttpStatusCode.OK, contentType: "text/plain", bodyType: typeof(string), Description = "The OK response")]
    public async Task<IActionResult> Run(
        [HttpTrigger(AuthorizationLevel.Anonymous, "put", Route = null)]
        HttpRequest httpRequest,
        [CosmosDB(
            databaseName: "ExploringAzureDBTest",
            collectionName: "ExploringAzureContainerTest",
            Id = "{Query.id}",
            PartitionKey = "{Query.id}",
            ConnectionStringSetting = "CosmosDbConnectionString")] Document document,
        [CosmosDB(
            databaseName: "ExploringAzureDBTest",
            collectionName: "ExploringAzureContainerTest",
            ConnectionStringSetting = "CosmosDbConnectionString")] DocumentClient client
        )
    {
        _logger.LogInformation($"C# HTTP trigger function processed a request. Function name: {nameof(UpdatePost)}");

        string id = httpRequest.Query["id"];

        if (document == null || string.IsNullOrEmpty(id))
        {
            return new BadRequestResult();
        }

        string newTitle = httpRequest.Query["new-title"];
        string newContent = httpRequest.Query["new-content"];
        bool newPublished = bool.Parse(httpRequest.Query["new-published"]);

        document.SetPropertyValue("title", newTitle);
        document.SetPropertyValue("content", newContent);
        document.SetPropertyValue("isPublished", newPublished);

        await client.ReplaceDocumentAsync(document.SelfLink, document);

        return new OkResult();
    }
}
So what's happening here is that we get the Post id and all the values to update, so the title, content and publish status in the query string.
We then get the Document using a CosmosDB attribute and instantiate a CosmosDB DocumentClient using the CosmosDB attribute.
With that we fill the document with the new values from the query string and finally call ReplaceDocumentAsync().
If it worked, the client will get a 200 OK response back.
Go ahead and test it out by running the project, grabbing a Post ID from the Data Explorer in the Azure Portal and filling in updated values in the Swagger UI.
The ReadPosts Function
Last but not least, we have the Read operation, which corresponds with the HTTP GET verb.
The goal of this Function is to get all the posts and return it to the client as an array of JavaScript Post objects in the body.
To save some time I'll give you the code and explain it below.
Go ahead and create a new C# file and name it ReadPosts.cs.
Replace its contents with the code below.
As always change the databaseName and collectionName to your values.
ReadPosts.cs
using System.Collections.Generic;
using System.Net;
using System.Threading.Tasks;
using Microsoft.AspNetCore.Http;
using Microsoft.AspNetCore.Mvc;
using Microsoft.Azure.Documents;
using Microsoft.Azure.WebJobs;
using Microsoft.Azure.WebJobs.Extensions.Http;
using Microsoft.Azure.WebJobs.Extensions.OpenApi.Core.Attributes;
using Microsoft.Extensions.Logging;
using Microsoft.OpenApi.Models;

namespace ExploringAzureFunctionsApp;

public class ReadPosts
{
    private readonly ILogger<ReadPosts> _logger;

    public ReadPosts(ILogger<ReadPosts> log)
    {
        _logger = log;
    }

    [FunctionName("ReadPosts")]
    [OpenApiOperation(operationId: "Run", tags: new[] { "Read posts" })]
    [OpenApiResponseWithBody(statusCode: HttpStatusCode.OK, contentType: "text/plain", bodyType: typeof(string), Description = "The OK response")]
    public async Task<IActionResult> Run(
        [HttpTrigger(AuthorizationLevel.Anonymous, "get", Route = null)]
        HttpRequest httpRequest,
        [CosmosDB(
            databaseName: "ExploringAzureDBTest",
            collectionName: "ExploringAzureContainerTest",
            SqlQuery = "SELECT * FROM c",
            ConnectionStringSetting = "CosmosDbConnectionString")] IEnumerable<Document> posts
        )
    {
        _logger.LogInformation($"C# HTTP trigger function processed a request. Function name: {nameof(ReadPosts)}");

        if (posts is null)
        {
            return new NotFoundResult();
        }

        foreach (var post in posts)
        {
            _logger.LogInformation(post.GetPropertyValue<string>("title"));
        }

        return new OkObjectResult(posts);
    }
}
So what's happening here is the following: We get an IEnumerable (basically a collection) of Documents, which are our posts. That IEnumerable<Document> is the result of the CosmosDB attribute that has a SQL query in it.
In the SQL query we simply SELECT * (all) FROM c (our table).
Then we check the data, log it if the data is nice and finally return the posts as a JavaScript array filled with Post objects with an HTTP 200 OK response.
Go ahead and test this out in the Swagger UI.
Publishing the Functions App to Azure
Now that all the features are done, let's publish the Functions App to Azure.
Close all tabs and stop the project from running.
Go to the Solution Explorer.
Right click your Functions project -> click Publish.
Select Azure and click Next.
In this tutorial, we'll host it on a Windows machine.
Select Azure Function App (Windows) and hit Next.
To create a new Function, click the little green + to the right.
A little modal window opens up.
For the Name, I recommend the same name as the project name in Visual Studio, so for me that's ExploringAzureFunctionsApp.
For the Subcription name, select Pay-As-You-Go.
For the Resource group, select the same as for your Azure Cosmos DB account.
For the Plan Type, keep Consumption.
For the Location, I recommend the same as your Azure Cosmos DB account.
Now the Azure Storage.
Why do we need that? Well, Azure Functions relies on Azure Storage for operations such as managing triggers and logging function executions. For example, in the case of a timer trigger function, it stores information about the last execution time along with other metadata and synchronization related information. So every Azure Function needs an Azure Storage Resource. These are cheap and the pricing is consumption based. If you even get any bills, they should be less than $1 total for this tutorial.
So Microsoft automatically filled in a storage account for us with low cost settings, we'll keep that. Just make sure it's in the same region as the other Resources of this tutorial.
If the settings look good, hit Create.
This usually takes less than 5 minutes for me.
When it's done, select the created Function app, keep Run from package file (recommended) checked, and hit Next.
Then we're on the API Management step, which we won't use, so check Skip this step in the bottom left corner.
Hit Finish.
Then hit Publish in the top right corner.
This usually takes less than 5 minutes for me.
When it's done, click Open site in the green square.
You'll come on the root URL of your functions app, the URL looks like this: https://resourcename.azurewebsites.net/
To see our Swagger UI, we simply need to add /api/swagger/ui to the URL.
So for me the full link is the following: https://exploringazurefunctionsapp.azurewebsites.net/api/swagger/ui.
Awesome! Now it doesn't work just yet, because we only added the Cosmos DB connection string locally.
Let's add it to our Functions App running in Azure.
Go to the Azure Portal and navigate to your Functions App Resource.
Navigate to the Configuration tab, under Settings.
Here we can add connection strings. We'll place it under Application settings because connection strings should only be used with a Function App if you are using Entity Framework.
Click + New application setting. A little box opens up.
Let's go back to Visual Studio to get the name and value. Copy and paste them, don't type because it needs to be exact.
Back in Visual Studio, open local.settings.json.
Under ConnectionStrings, copy CosmosDbConnectionString WITHOUT quotes.
Go back to your browser with Azure open and paste it in the Name field.
Go back to Visual Studio.
Copy the entire connection string WITHOUT quotes. I recommend shift clicking the beginning and end.
Go back to your browser with the Azure Portal open and paste it in the Value field.
Finally, tick Deployment slot setting.
You can compare your entries with mine in the image below (right click -> Open in new tab to enlarge).
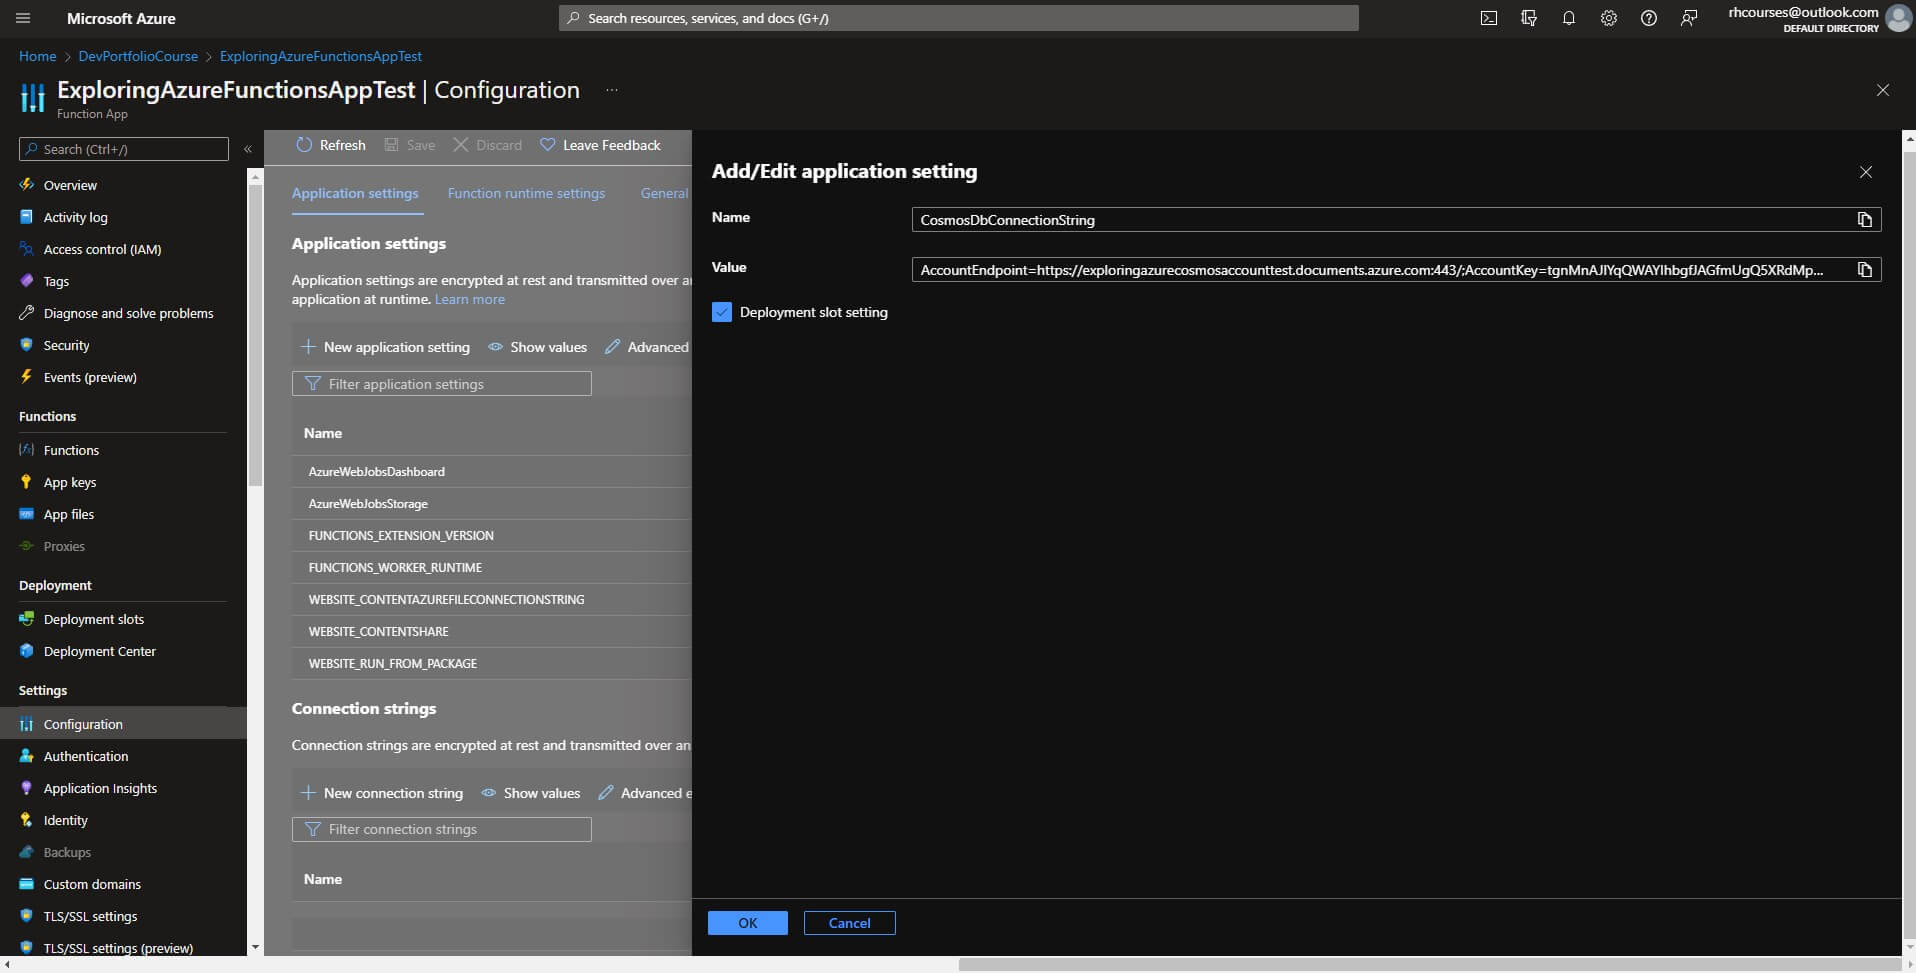
If it looks good, hit Ok.
Then, make sure you hit Save at the top, then Continue. Your app will restart.
Restarting usually takes seconds.
If we now go back to the Functions app Swagger UI tab we can test our Functions!
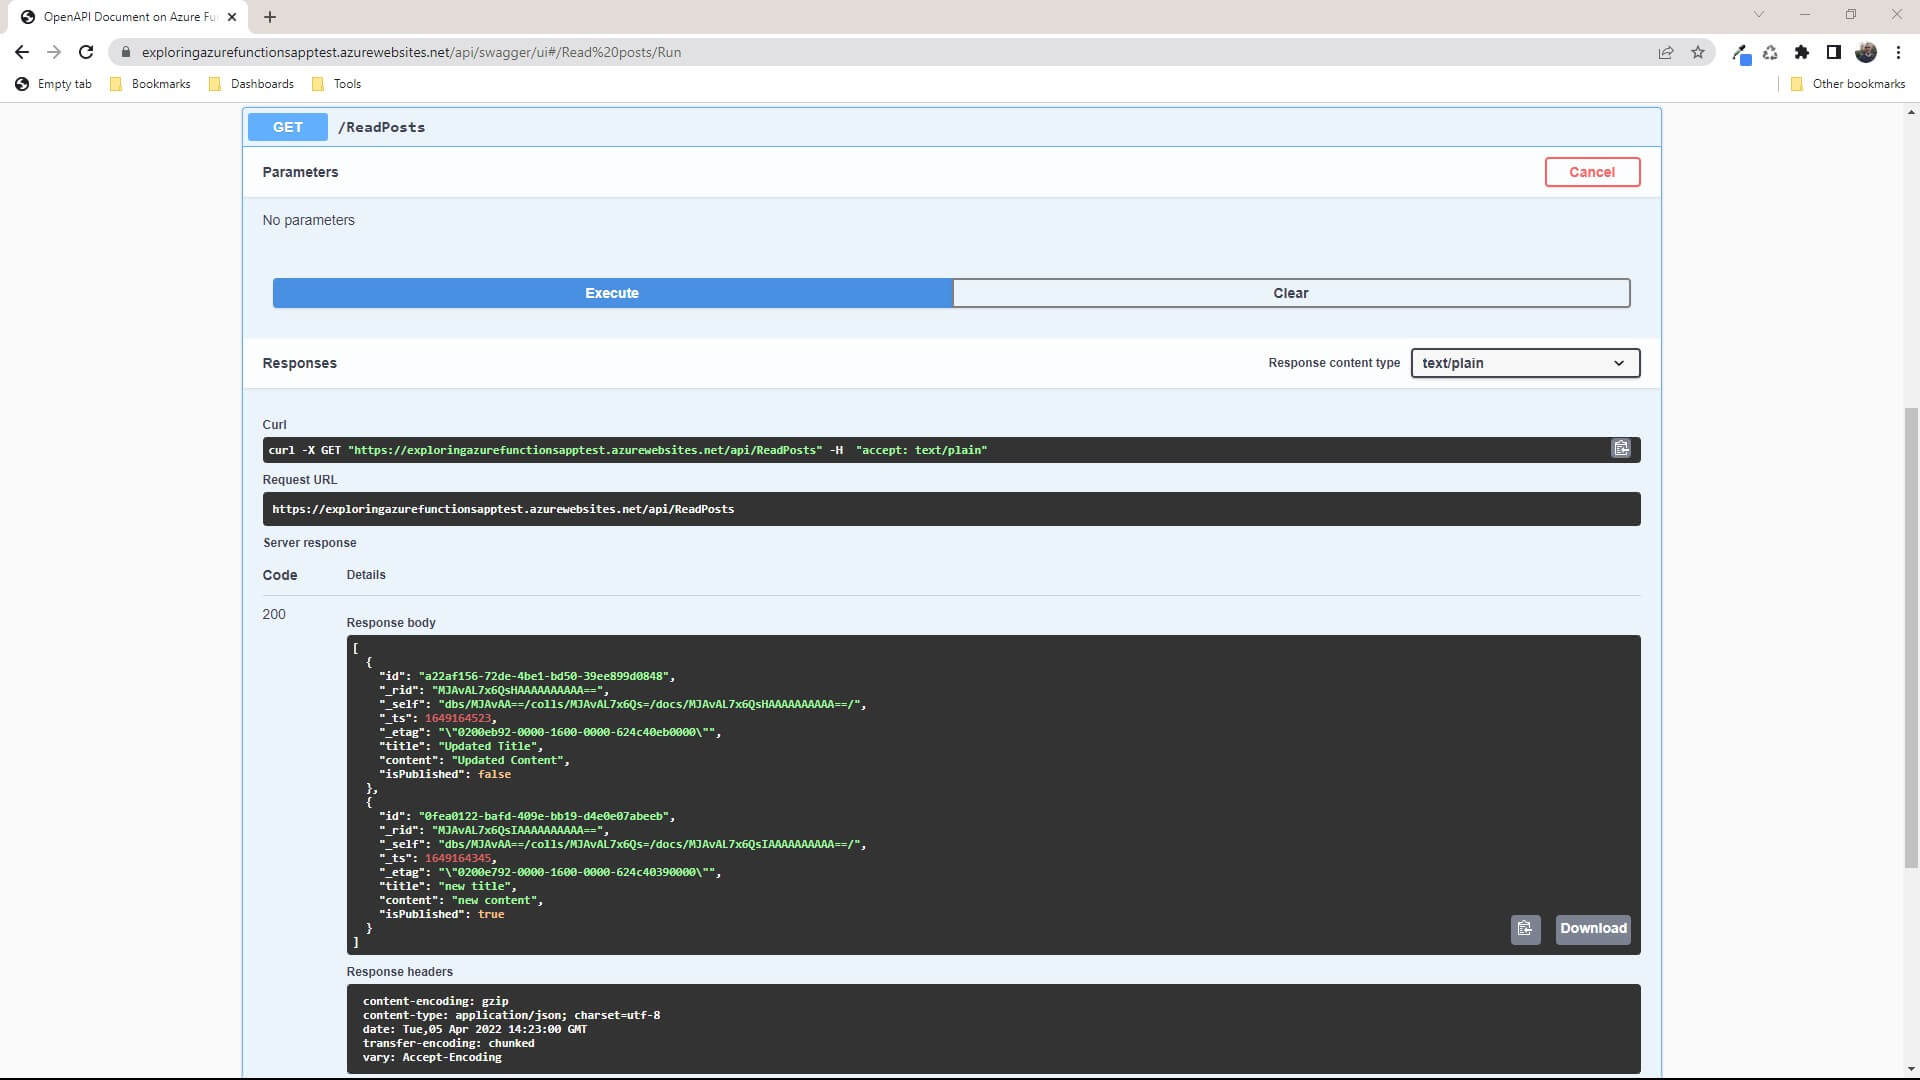
To test it out, I recommend starting with reading all the posts. So just expand the GET Function, click Try it out and Execute.
You should get all your posts now, like in the image below (right click -> Open in new tab to enlarge).
I'll leave it to you to test the other endpoints.
Deleting the Resources Made in This Tutorial
If you want to ensure you don't get any bills, you have to delete all Resources we created in this tutorial.
The easiest way to do that is to just delete the containing Resource Group. That will delete all Resources in it.
It's very simple. This guide has a step-by-step plan.
Conclusion
Phew, that was quite a ride. If you read it all I want to thank you for your time and trust.
You have learned how to build a serverless API with Azure Functions that interacts with a globally distributed, multi-model database service, otherwise known as Azure Cosmos DB. We managed to implement the classic CRUD operations (Create, Read, Update and Delete) on a simple Post model.
I'd love to hear your feedback and other thoughts in the comments below. You can just use your GitHub account to comment.
In the previous episode the Microsoft Azure Cloud got introduced. In the next episode we'll take a look at the web part of .NET, focusing on the ASP.NET framework so stay tuned for that!
Sources
Microsoft Docs - Data modeling in Azure Cosmos DB - https://docs.microsoft.com/en-us/azure/cosmos-db/sql/modeling-data?WT.mc_id=AZ-MVP-5003556
Microsoft Docs - Request Units in Azure Cosmos DB - https://docs.microsoft.com/en-us/azure/cosmos-db/request-units
Will Velida on Medium - Creating a Web API with Azure Functions, Azure Cosmos DB MongoDB API and C# - https://medium.com/geekculture/creating-a-web-api-with-azure-functions-azure-cosmos-db-mongodb-api-and-c-9bd8d528405a
Microsoft Docs - Connect Azure Functions to Azure Cosmos DB using Visual Studio Code - https://docs.microsoft.com/en-us/azure/azure-functions/functions-add-output-binding-cosmos-db-vs-code?tabs=in-process&pivots=programming-language-csharp
Microsoft Docs - Create serverless APIs in Visual Studio using Azure Functions and API Management integration (preview) - https://docs.microsoft.com/en-us/azure/azure-functions/openapi-apim-integrate-visual-studio
Microsoft Docs - Storage considerations for Azure Functions - https://docs.microsoft.com/en-us/azure/azure-functions/storage-considerations
Microsoft Docs - Azure Functions hosting options - https://docs.microsoft.com/en-us/azure/azure-functions/functions-scale
A bunch of StackOverflow entries. Can't remember them all. This answer from Nick Chapsas did help me out. - https://stackoverflow.com/a/55345269
Good luck on your developer journey!